Halloween is just around the corner, and it’s the perfect time to embrace your dark side with some stunning black Halloween nails. This season always reminds me of the thrill in the air, the spooky decorations, and, of course, the creative ways we can express our love for all things Halloween. Whether you’re planning to attend a spooky bash or just want to feel festive during the month of October, black nails can add that perfect touch of chic and eerie to your look. I created this post to help you find nail art ideas that will make your fingers look fierce and fashionable.
If you’re someone who loves beauty trends, gothic styles, or simply enjoys expressing yourself through nail art, this collection is especially for you. We know how important it is to find unique ways to celebrate the season while feeling confident and stylish. From intricate designs to minimalistic touches, these ideas will speak to your love for spooky aesthetics and give you plenty of inspiration for your Halloween manicure.
In this post, you’ll discover 17 fabulous black Halloween nail ideas that are sure to impress. Each design is dark, elegant, and perfect for getting into the Halloween spirit. Whether you’re into glossy finishes, spooky nail art, or gothic designs, you’ll find exactly what you need right here. Get ready to elevate your nail game and embrace the spookiness with these chic ideas!
Key Takeaways
– Explore a variety of black Halloween nails, including glossy, matte, and ombre styles to suit your mood.
– Discover spooky nail art designs featuring spiders, bats, and ghosts that will elevate your Halloween look.
– Learn about dark floral designs and gothic crosses for a more elegant but eerie vibe.
– Find tips on using Halloween-themed nail stencils to create professional-looking designs at home.
– Get practical insights on how to incorporate glow-in-the-dark elements to make your nails pop at night.
1. Glossy Black with Gold Accents
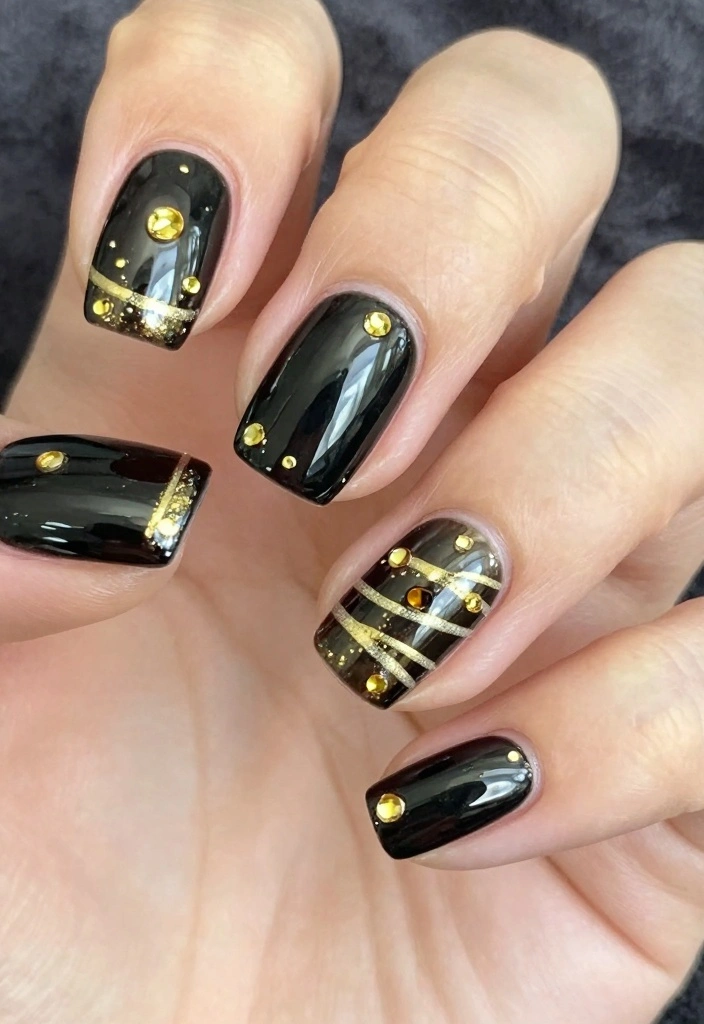
If you’re aiming for a stunning look this Halloween, glossy black nails with gold accents are the way to go. Picture your nails shining with a rich black polish, paired with chic gold stripes or dots that catch the light beautifully. This design strikes the perfect balance between elegance and boldness, ideal for parties or just to add some glamour to your spooky season attire.
To achieve this stylish look, start by applying a protective base coat. Follow up with two coats of high-quality black polish for depth and richness. Once everything is dry, unleash your creativity with a thin brush to add those luxurious gold accents—lines, dots, or even tiny stars can elevate your nails.
Key steps to create this design:
– Apply a base coat for protection
– Use two coats of high-quality black polish
– Add gold accents with a striping brush
– Seal with a quick-dry topcoat for shine and durability
This chic design not only boosts your Halloween spirit but also makes your nails the center of attention wherever you go.
Fun fact: glossy black with gold accents catches the light, turning ‘black halloween nails’ into a party-ready statement. A simple base coat plus thin gold stripes creates high-impact glamour that photographs beautifully.
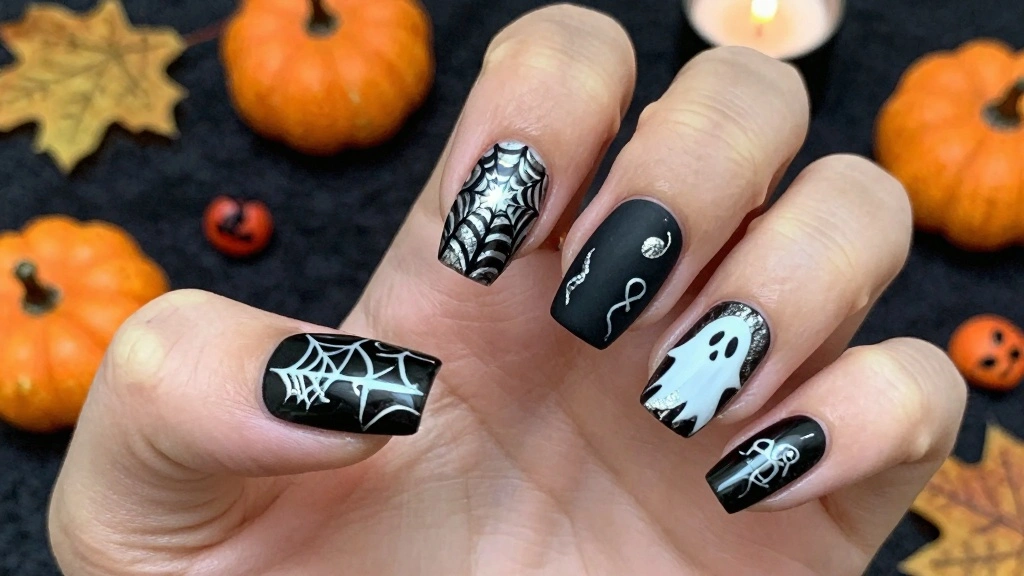
2. Matte Black with Spider Webs
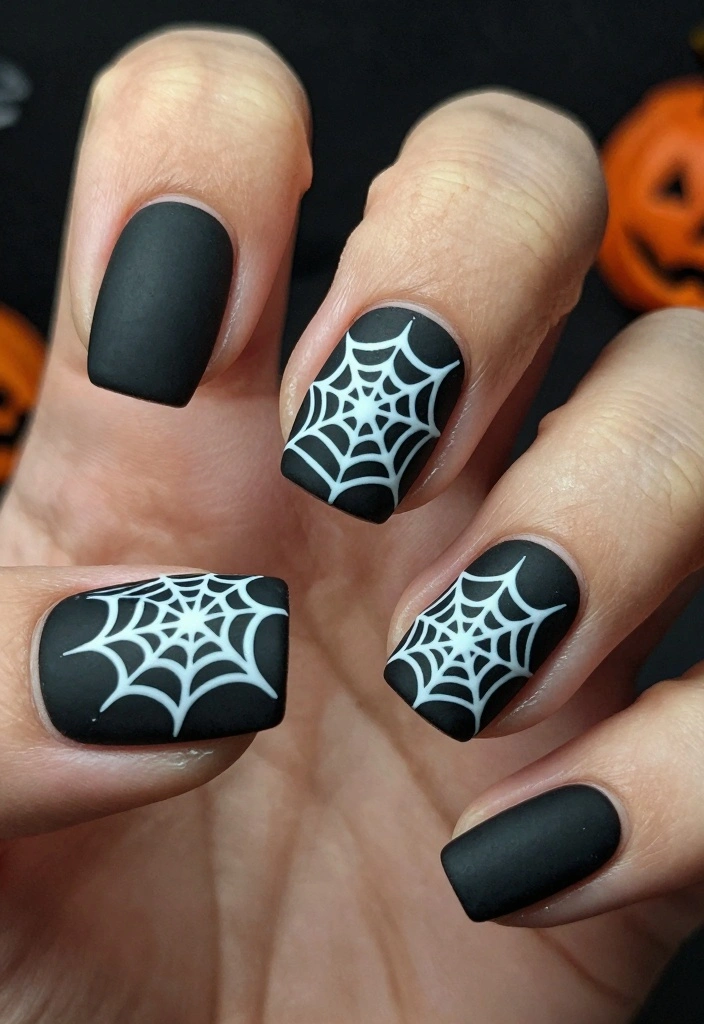
For those who prefer a mysterious edge, matte black nails featuring spider web designs offer a perfect Halloween vibe. The velvety matte finish contrasts strikingly with the delicate web details, making your nails a standout accessory for the season. Each nail can showcase a unique web design or a subtle accent, making this versatile for any Halloween event.
To get started, apply a base coat for extra durability, then layer on two coats of matte black polish. Use a fine nail art brush to create white or metallic spider webs, remembering that these designs can be whimsically imperfect—just like in nature!
Here’s how to nail this spooky style:
– Start with a durable base coat
– Apply two layers of matte black polish
– Draw spider webs with a fine brush
– Finish with a matte topcoat for that velvety look
This design not only captures the spooky spirit of Halloween but also showcases your artistic flair.
How To Choose Black Halloween Nails
Choosing the right style for your black Halloween nails can be both exciting and overwhelming. With so many options out there, it’s essential to consider various factors that will enhance your spooky chic look. Here are some key points to help you make the best choice:
1. Nail Length
Consider how long you want your nails to be. Short nails can give a clean, modern look, while long nails provide a dramatic flair perfect for Halloween. If you prefer intricate designs, longer nails offer more space to showcase spooky nail art like bats or ghosts. Think about your lifestyle too; longer nails may require more maintenance and care.
2. Finish Type
The finish of your nail polish greatly affects the overall vibe. A glossy finish can give a sleek, polished look, while a matte finish adds a more gothic touch. If you want a hint of sparkle, look for glitter top coats or shades that incorporate shimmer. Mixing finishes can also create an eye-catching effect—imagine matte black nails adorned with glossy spider web designs!
3. Design Complexity
Decide how intricate you want your nail designs to be. Simple patterns like black ombre or ghostly faces can be easy to achieve at home. If you’re feeling adventurous, you might want to try detailed nail art featuring haunted houses or creepy crawly designs. If you’re not skilled at nail art, consider using Halloween-themed nail stencils to help create intricate designs without the fuss.
4. Nail Art Accessories
Think about what accessories you might want to incorporate. Rhinestones, studs, or decals can add depth and glam to your black Halloween nails. For instance, sparkly black polish combined with rhinestones can create a glamorous effect that complements any Halloween costume. Make sure these accessories are securely attached to avoid any last-minute mishaps.
5. Color Pairing
While black is the main focus here, consider incorporating other colors. Gold or silver accents can add a chic touch, while vibrant colors like orange or green can enhance the Halloween theme. Using a combination of colors can make your black Halloween nails stand out even more. Think about your costume too—matching your nails with your outfit can tie the whole look together.
6. Time Commitment
Finally, assess how much time you’re willing to spend on your nails. Some designs can take a while, especially if you’re doing them yourself. If you’re short on time, opt for quicker designs like classic witch hat accents or spooky nail stickers. On the flip side, if you enjoy the process, dive into more complex nail art that allows you to get creative and express your Halloween spirit.
Pro Tip: Always do a patch test with any new products you plan to use, especially nail art accessories. This way, you can avoid any allergic reactions and ensure everything adheres well to your nails. Enjoy the spooky season and let your creativity shine!
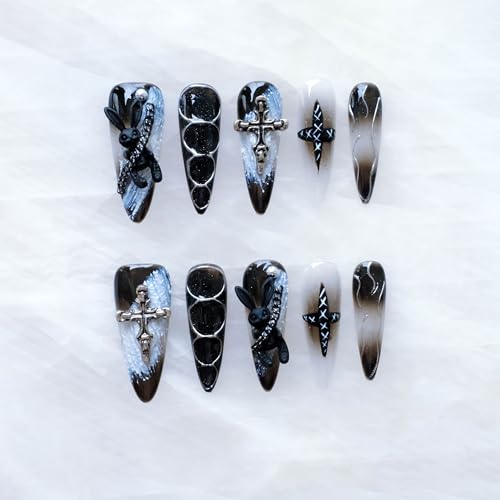
3. Gothic Cross Designs
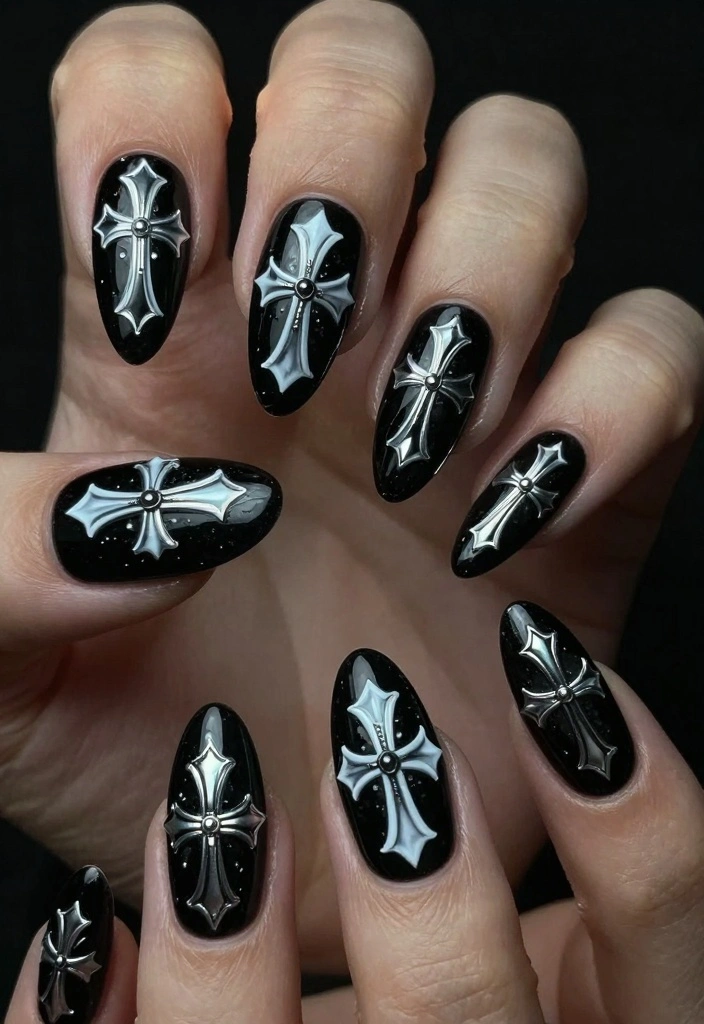
Embrace your gothic side with striking cross designs on your nails this Halloween. This look is perfect for those who want to blend dark elegance with festive spirit. Start with a solid black base for all your nails, then select a few to showcase dramatic white or metallic crosses that stand out beautifully against the dark background.
To create these designs, use a precise nail art brush for clean lines. Feel free to choose between simple crosses or more intricate designs with chains or floral elements. This style can be adapted to both matte and glossy finishes, allowing you to express your unique style.
Steps to achieve this gothic look:
– Paint your nails black for the base
– Use a nail art brush for cross designs
– Personalize with chains or floral accents
– Seal with a topcoat for a polished look
This nail art not only reflects your personal aesthetic but also brings a bold statement to your Halloween celebrations.

4. Creepy Crawly Nail Art
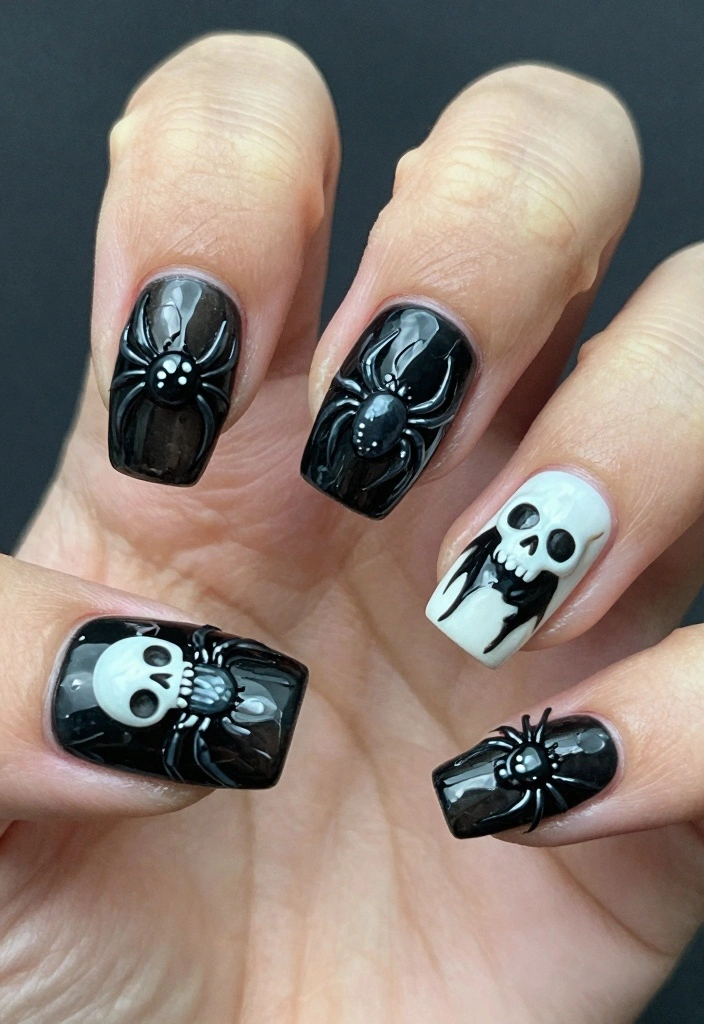
Get into the spooky spirit with creepy crawly nail art! Featuring designs of spiders, bats, and tiny skulls, this fun look is perfect for Halloween. Start with a solid black base to set the eerie mood, and let your imagination run wild by incorporating your favorite creepy creatures.
If freehand drawing feels intimidating, consider using nail stickers or stencils for a quicker, easier process. After your base is dry, strategically place your chosen designs on your nails, and seal everything in with a glossy topcoat for a shiny finish.
To kick up the spookiness:
– Use glow-in-the-dark polish for nighttime effects
– Choose stickers for intricate details without the hassle
– Layer designs for a more dynamic look
This nail art brings a playful edge to your Halloween festivities, making your nails a conversation starter all night long.
5. Black Ombre with Glitter
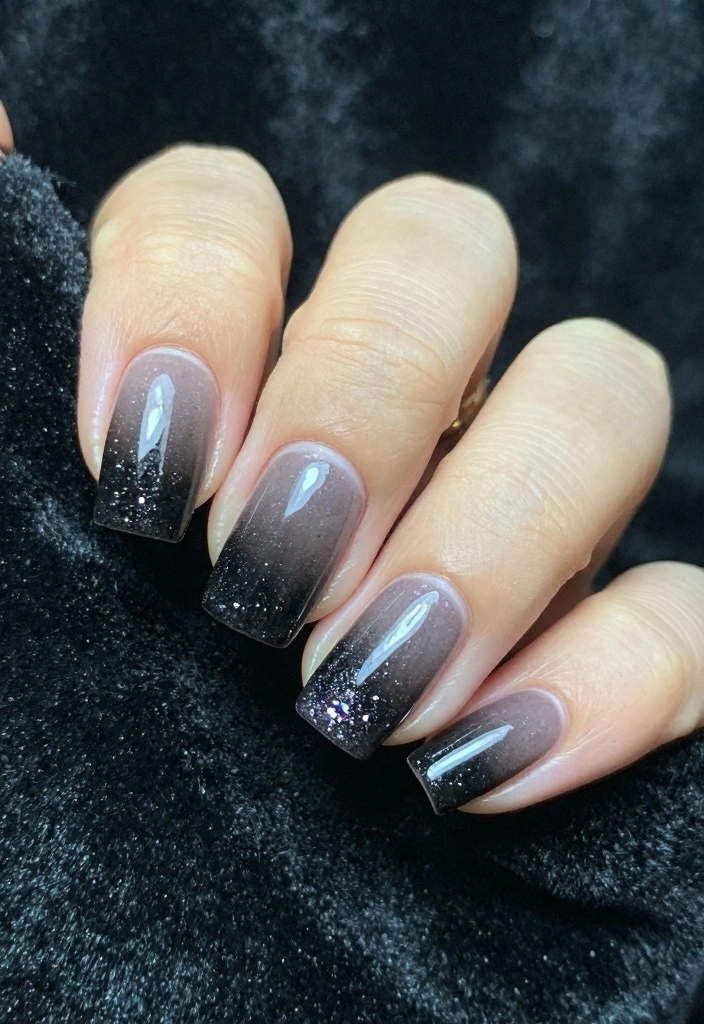
Ombre nails are always in style, and what better way to celebrate Halloween than with a black ombre design? This look transitions smoothly from deep black at the cuticle to a sparkling glittery finish at the tips, creating a captivating gradient effect that’s both chic and spooky.
To create this stunning look, begin with a base coat, then add black polish at the base of your nails. Use a makeup sponge to dab on glitter as you blend toward the tips, ensuring a seamless transition. Top it off with a glossy topcoat for added shine and protection.
Key steps for a perfect ombre:
– Apply a protective base coat first
– Use a makeup sponge for blending glitter
– Experiment with different colored glitters
– Finish with a glossy topcoat for shine
This design is a beautiful way to showcase your creativity while keeping the Halloween spirit alive.


6. Ghostly Faces
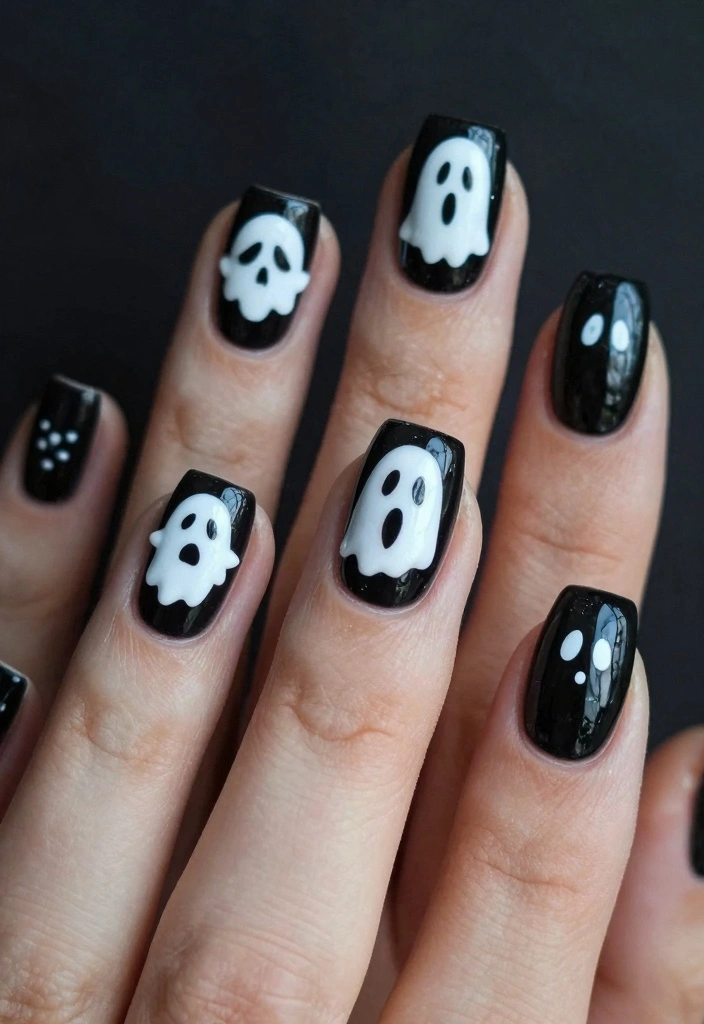
Add a fun yet spooky element to your Halloween nails with adorable ghostly faces! Each nail can be a mini canvas for cute or eerie ghost designs that celebrate the festive spirit of the season. You can keep it simple with white ghost shapes against a black background or get creative with various expressions and accessories.
Start with a black base coat, letting it dry completely. Use white polish or nail art pens to draw simple ghost shapes, adding facial features that reflect their unique personalities. Seal the design with a topcoat to ensure longevity throughout the festivities.
Here’s how to create ghostly faces:
– Use white polish for ghost shapes
– Add features for personality
– Incorporate tiny rhinestones for flair
This playful design will surely bring smiles and compliments, making your nails a highlight of Halloween.
7. Dark Floral Designs
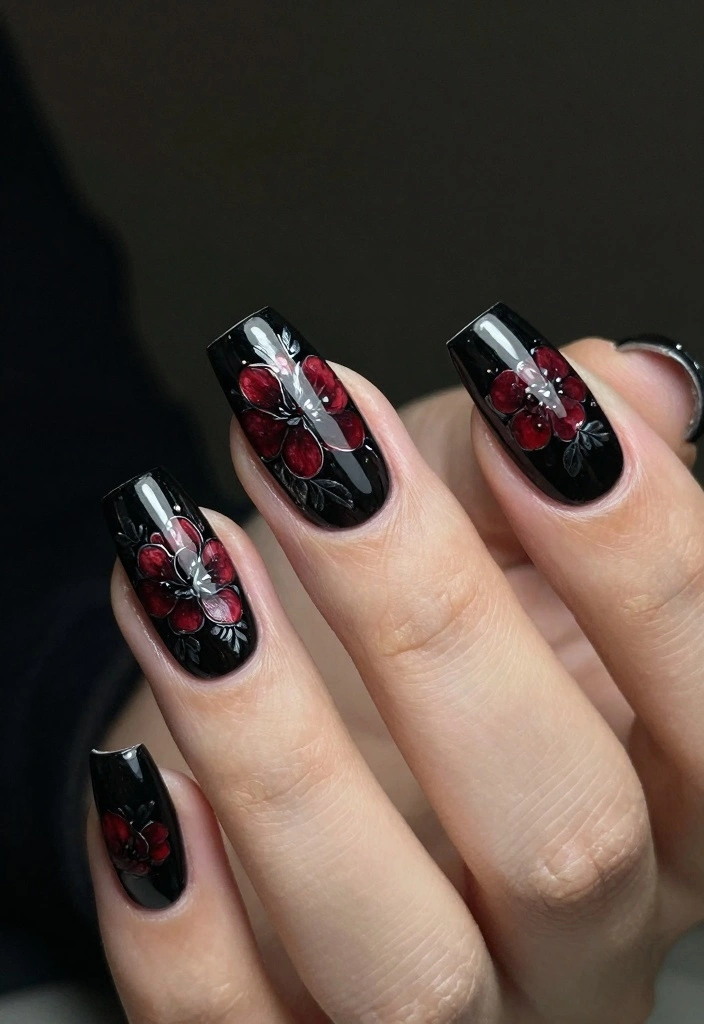
For a sophisticated twist on Halloween nails, dark floral designs can be an excellent choice. Imagine black nails adorned with deep red or silver florals, adding elegance while embracing the spooky theme. This design can be as simple or detailed as you like, making it perfect for various Halloween events.
Start with a black base and use a fine brush or stamping plate to create floral designs in contrasting colors. Adding leaves and intricate details will elevate the overall look. Seal everything with a glossy topcoat for a polished finish.
Steps to achieve dark florals:
– Paint your nails black for the base
– Use a fine brush for floral designs
– Incorporate leaves for depth
This design is a beautiful way to celebrate Halloween while keeping a touch of elegance in your style.
8. Halloween Themed Nail Stencils
If freehand designs feel daunting, Halloween-themed nail stencils can make the nail art process easy and enjoyable! These stencils allow you to create intricate designs quickly, perfect for adding flair to your black Halloween nails without the hassle.
Select your favorite Halloween shapes—think pumpkins, bats, or witch hats. Start with a black base coat, let it dry completely, then apply the stencil and paint over it with contrasting colors. Once dry, carefully peel off the stencil and finish with a topcoat for durability.
Key tips for using stencils:
– Hold the stencil firmly to avoid smudging
– Consider a gradient effect beneath the stencil
– Experiment with different colors for unique looks
Using stencils not only saves time but also ensures that your designs look professional and polished.
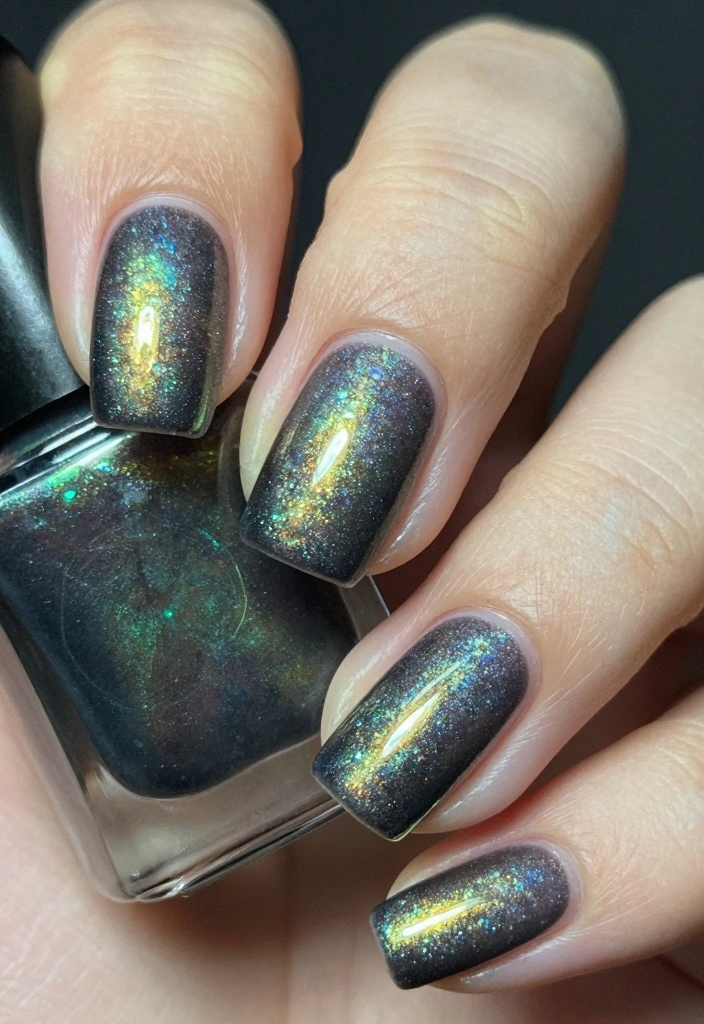
9. Sparkly Black with Rhinestones
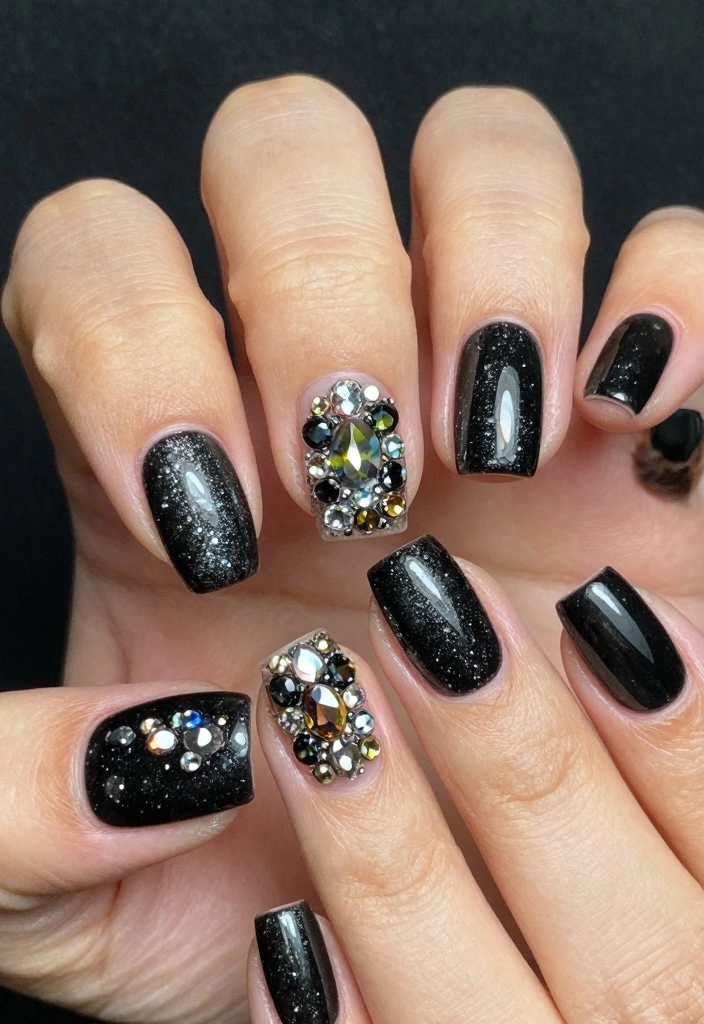
Elevate your Halloween look with sparkly black nails enhanced by rhinestones. This design artfully combines classic elegance with festive fun, ensuring your nails catch everyone’s eye. The shimmer of the black polish alongside the glimmer of rhinestones creates a dazzling effect that’s perfect for the season.
Begin by applying a glossy black polish, allowing it to dry completely. Once dry, randomly place rhinestones on your nails, securing them in place with a topcoat. Choose larger stones for dramatic flair or tiny gems for a more subtle shine.
Steps to create this glamorous look:
– Use a glossy black polish as a base
– Randomly place rhinestones for effect
– Create patterns for added flair
This sparkly design will not only enhance your Halloween spirit but also add a touch of glamour to your overall look.
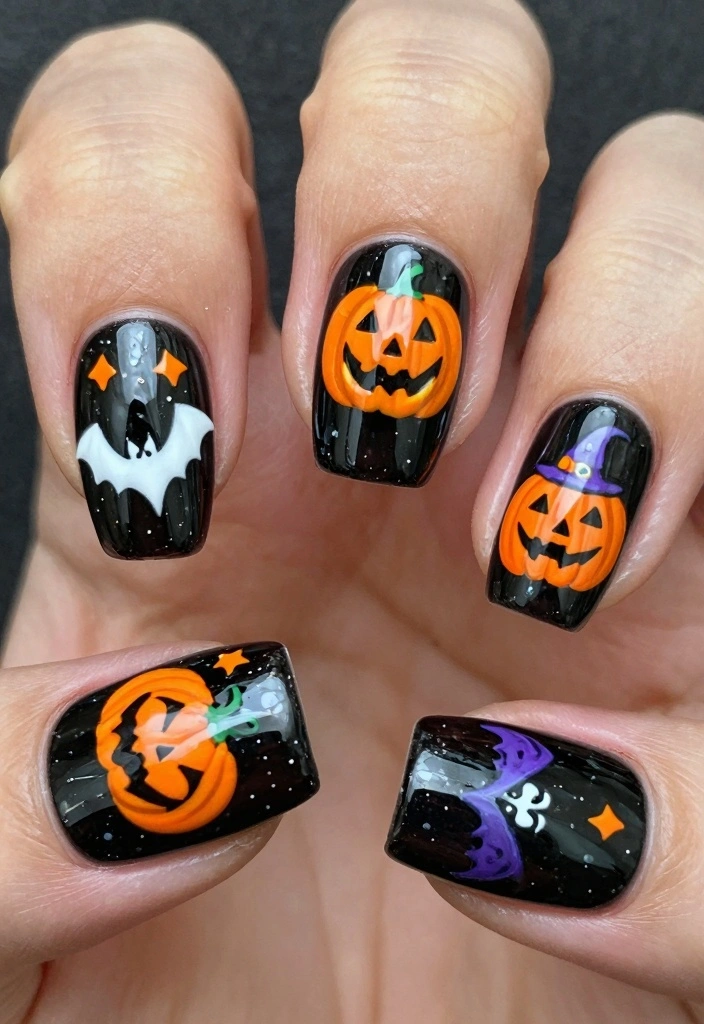
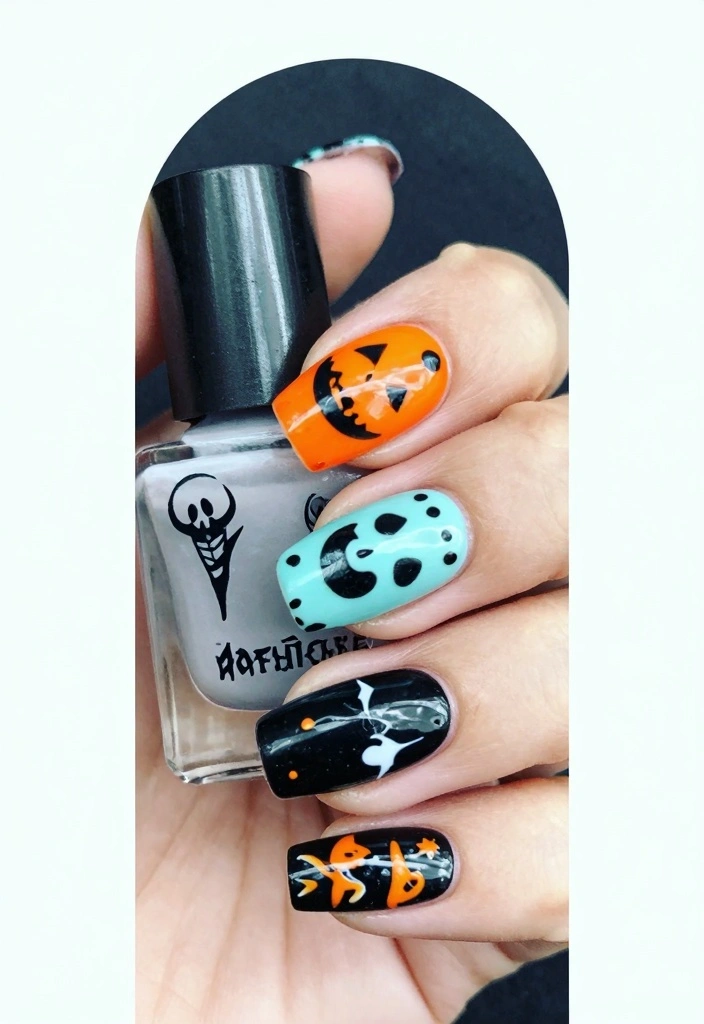
10. Pumpkin Spice Nail Art

Celebrate the fall season with vibrant pumpkin spice nail art! This fun design combines black with hints of orange, mirroring the festive feel of pumpkin spice lattes and autumn vibes. Start with a black base, then use orange to create pumpkin designs or spice-inspired swirls that capture the essence of Halloween.
For those who love details, try adding tiny pumpkin graphics alongside fall leaves for an extra seasonal touch. This design embodies the spirit of Halloween while celebrating the beauty of autumn, creating a unique twist for your black Halloween nails.
Steps to create pumpkin spice art:
– Paint your nails black as a base
– Use orange for pumpkin shapes or swirls
– Incorporate fall leaves for added detail
This playful design is perfect for showcasing your festive spirit while staying stylish.
11. Classic Witch Hat Accent Nails
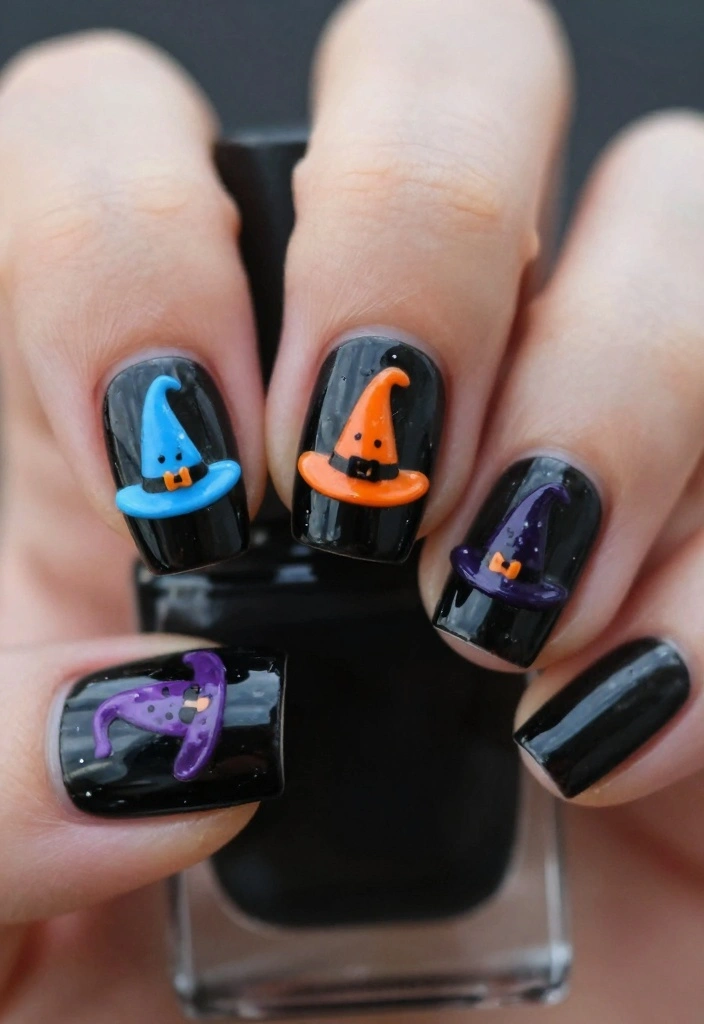
Nothing embodies Halloween quite like witch hats! Utilize your black base to craft playful designs featuring tiny witch hats on a couple of accent nails. This subtle yet charming look is perfect for those wanting a fun twist without going overboard.
Start by painting your nails black, then select one or two nails as accent pieces. Use a thin nail art brush to create witch hats in contrasting colors, like deep green or purple. Finish with a topcoat for durability.
Key steps for this charming design:
– Keep designs small for a sleek appearance
– Add glitter for an enchanting touch
– Experiment with colors to match your style
This design not only adds a whimsical touch to your Halloween look but is also simple enough to create at home.
12. Glow-in-the-Dark Black Nails
For a standout design that shines in the dark, glow-in-the-dark black nails are a fantastic choice! This fun look will have your nails glowing when the lights go out, making it perfect for Halloween celebrations.
Start with a black base coat, then apply a glow-in-the-dark topcoat or polish on top. Make sure to activate the glow by exposing your nails to light for a few minutes before heading out. This design is sure to draw attention and start conversations throughout the evening.
Steps for creating glow-in-the-dark nails:
– Use a black base coat first
– Apply glow-in-the-dark polish for effect
– Combine with other designs for added fun
This design is not only eye-catching but also adds a playful twist to your Halloween festivities.
13. Scary Monster Designs
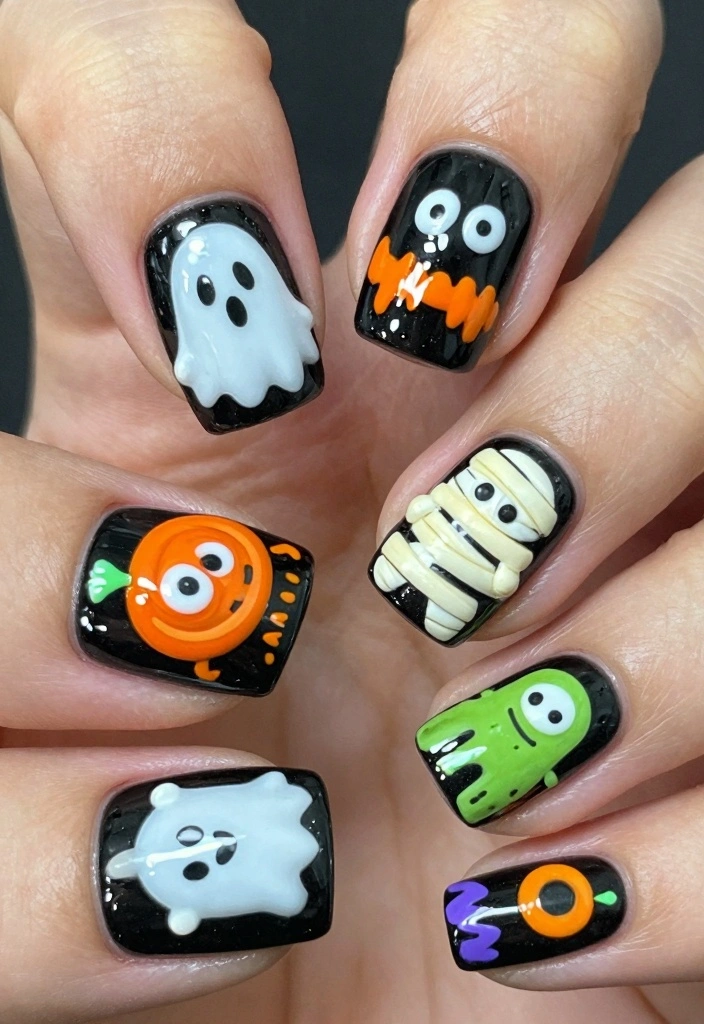
For those who enjoy the playful side of Halloween, scary monster designs can add a fun touch to your black Halloween nails. Each nail could showcase a different monster, from cute ghosts to spooky mummies, making your nails a festive canvas.
Start with a black base and use bright colors like red, green, or purple for the monster details. Simple designs can be created using a dotting tool, or you can go all out with detailed fine brushwork. Let your creativity shine as you make each nail a mini work of art.
Steps to create monster designs:
– Use bold colors against a black background
– Create simple shapes for easy designs
– Add googly eyes for extra fun
This design is not only fun to create but also brings a joyful spirit to your Halloween look.
14. Raven Feathers Nail Art
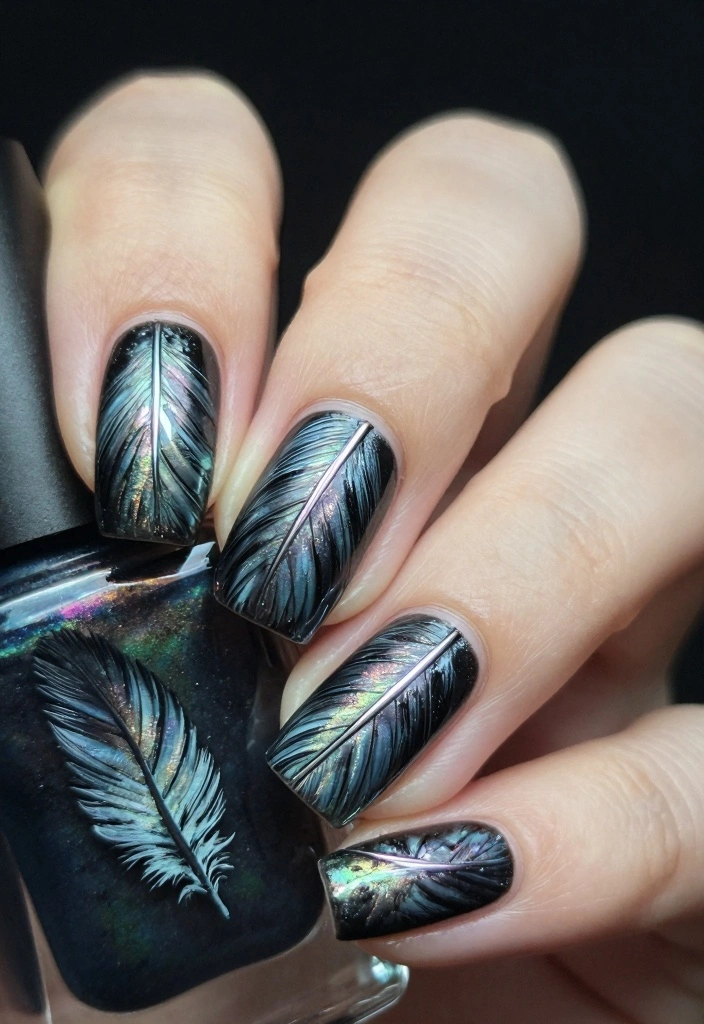
Bring the mystique of nature to your Halloween nails with raven feathers art. This design offers a blend of sophistication and eeriness, perfect for gothic nail enthusiasts. Start with a sleek black base and use soft strokes of metallic or iridescent polish to mimic feather shapes on your nails.
Using a thin brush, gently sweep the metallic polish into feather-like patterns. You can choose to decorate all nails or just a few for a more understated look. Finish with a topcoat to ensure a glossy effect.
Steps for creating raven feathers:
– Start with a black base coat
– Use metallic polish for feather designs
– Experiment with colors like deep green or purple
This design elevates your Halloween style with an elegant twist that is sure to impress.
15. Haunted House Nail Art
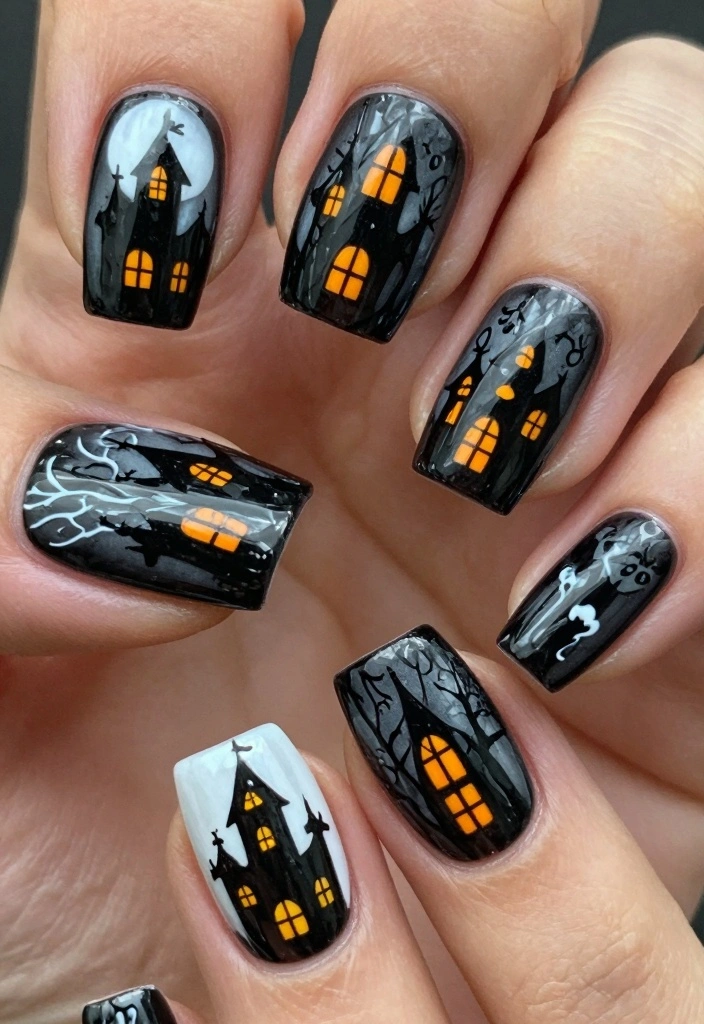
Turn your nails into a spooky scene with haunted house nail art! This design features eerie silhouettes of haunted houses against a black backdrop, creating a festive Halloween vibe. Begin with a solid black base, then paint haunted houses using white or bright colors for a dramatic contrast.
Focus on adding details like windows, spooky trees, and ghosts peeking out to bring your haunted house to life. Seal everything with a topcoat for durability and shine.
Steps to achieve haunted house art:
– Paint your nails black for the base
– Use bright colors for haunted house silhouettes
– Add glow-in-the-dark elements for extra spookiness
This design is a creative way to celebrate Halloween, making your nails a fun topic of conversation.
Fun fact: 82% of DIY black halloween nails look most striking when a solid black base is paired with bright silhouettes. Start with black, sketch haunted houses in white, add tiny windows and ghosts for contrast—topcoat for lasting, spooky shine.
16. Bat Silhouettes
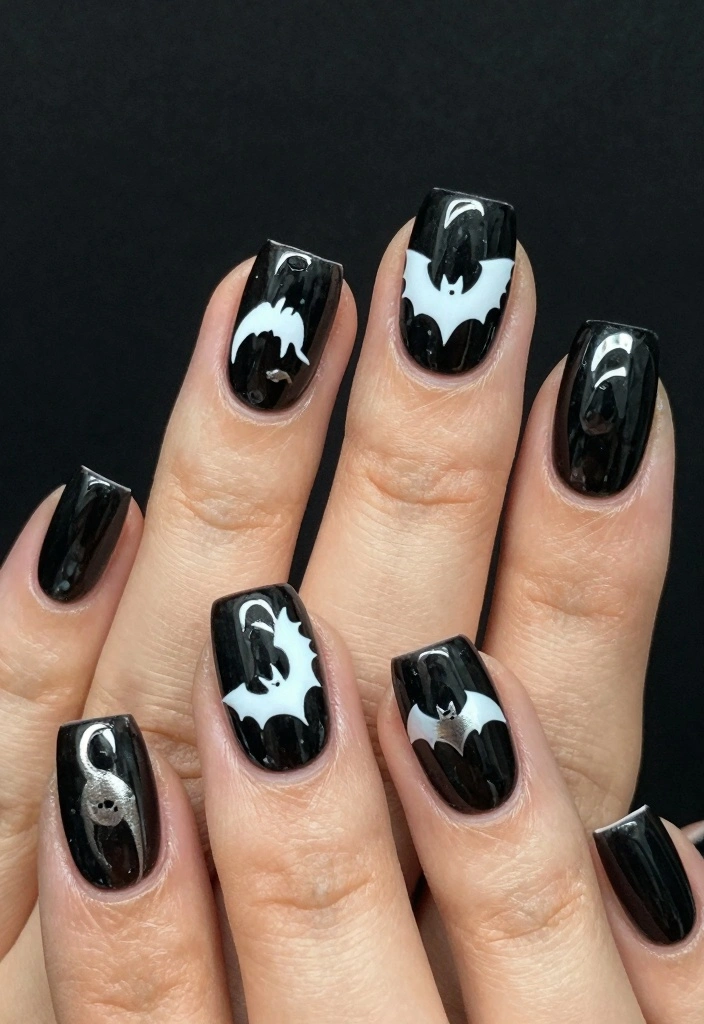
Bats are a quintessential symbol of Halloween, making bat silhouettes an essential design for your black Halloween nails. This simple yet striking look captures the essence of the season beautifully. Begin with a matte black base, then use a thin brush to paint small bat shapes across your nails in white or metallic shades.
Vary the size and orientation of the bats for added visual interest. Seal your design with a glossy topcoat to make those bats pop against the matte background.
Steps for creating bat silhouettes:
– Use a matte black base coat
– Paint bats in contrasting colors
– Add glittery stars for a night sky effect
This design is versatile and suitable for any nail length, ensuring everyone can join in the Halloween fun.
17. Spider and Web Combo
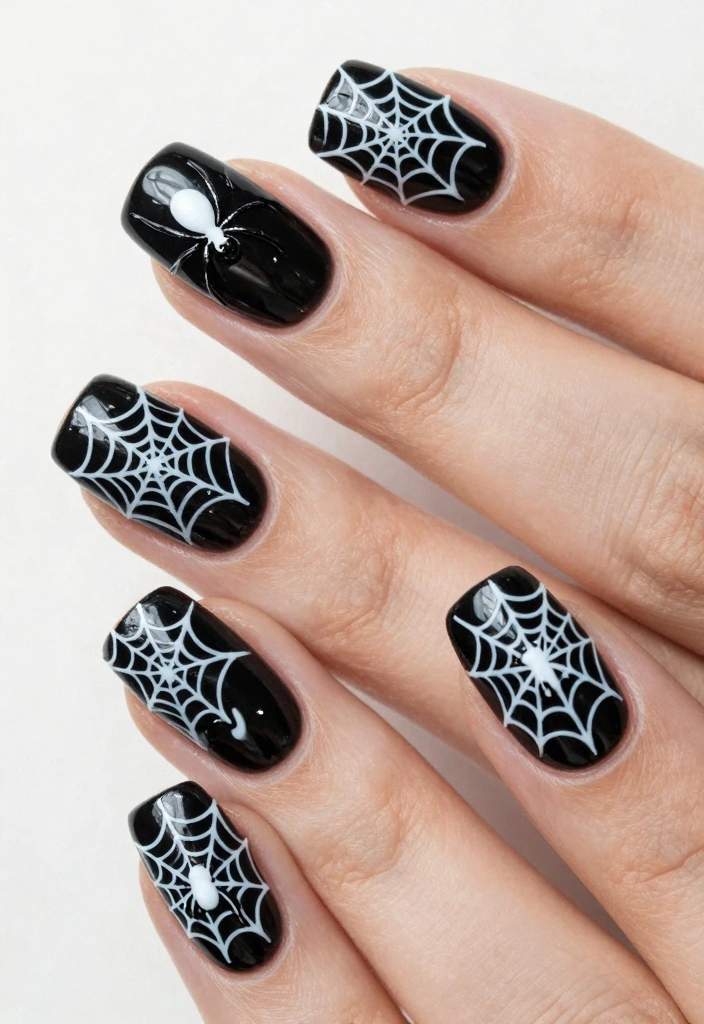
Create a stunning Halloween design with a spider and web combo on your black nails! This eye-catching look combines the delicate intricacies of spider webs with the creepiness of spiders, making it perfect for the season. Start with a glossy black base, allowing it to dry completely before adding your designs.
Using a fine brush, draw intricate spider webs on one or two accent nails, then add small spider details to complete the look. This combination creates a striking contrast that is sure to turn heads. Finish with a high-shine topcoat to protect your art.
To achieve this design:
– Draw webs starting from the center outward
– Add spiders on top for an added touch
– Use glow-in-the-dark polish for extra spookiness
This unique design is not only visually appealing but also a fun way to embrace the Halloween spirit.
Fun fact: 65% of DIY nail art fans say a spider web design on black halloween nails elevates Halloween vibes instantly. Start with a glossy black base, then fine-webs on accent nails to spark contrast.
Conclusion
This Halloween, let your nails reflect the spooky and chic side of the season! From glossy blacks adorned with gold accents to playful ghost designs, there’s an endless variety of black Halloween nails that can fit your style. Embrace your creativity and try a few of these ideas to make a statement this Halloween.
Remember, your nails are an extension of your personality, and they can express the fun and festive spirit of this time of year. Whether you’re going for something classic, elegant, or whimsical, you’ve got plenty of inspiration for your next manicure!
Frequently Asked Questions
What are the best ways to create flawless black halloween nails at home?
For flawless black halloween nails at home, start with clean, dry nails and a solid nail-prep routine. Begin with a base coat to protect nails and improve adhesion, then apply two thin coats of a rich black polish. Finish with a durable top coat to seal and prevent chipping. If you want longer wear, try gel polish or a gel top coat. For spooky flair, add spooky nail art like tiny cobwebs or bats with a fine brush. If you prefer texture, experiment with a matte finish for a Gothic twist. Let each layer dry thoroughly and cap the free edges to protect your black halloween nails.
Which spooky nail art designs pair best with black halloween nails?
Your canvas is black halloween nails, so start with simple silhouettes. Try spooky nail art like cobwebs, bats, skulls, or lace patterns, then add a pop of contrast with white, red, or metallic accents. For Halloween beauty trends, opt for bold lines on a midnight backdrop or metallic chrome foils that cling to the edges of the nail. If you’re unsure about freehand, use stamping plates or decals to achieve crisp Halloween nail designs and keep your dark nail ideas cohesive with the Gothic manicure vibe.
How can I make black halloween nails last longer through Halloween season?
To extend wear on black halloween nails, follow a simple routine: prep and buff, apply base coat, then two thin coats of deep black, and finish with a durable top coat. Reapply the top coat every 2–3 days to prevent chipping, and consider gel polish or a gel top coat for extra longevity. Wear gloves for chores, avoid harsh acetone, and moisturize cuticles to keep nails strong throughout the spooky season.
What tools and supplies do I need for a gothic manicure with black nails?
Gear up with essential items for the gothic manicure look: black nail polish (or gel polish), base coat, and top coat; fine nail art brushes and a dotting tool; white and metallic polishes or acrylic paint for details; stamping plates or decals for spooky nail art; nail tapes or vinyls for clean lines; rhinestones or studs for extra drama; and a choice of matte or glossy finish to switch up the vibe.
Are there color or texture variations to keep black halloween nails interesting beyond plain black?
Absolutely. You can keep black halloween nails fresh with variations like glossy black, matte black, or black with subtle glitter. Try a velvet matte texture, chrome or metallic foils, or a gradient that fades into deep red or purple. Add spooky nail art such as cobwebs, bats, or skeletal accents, and sprinkle in tiny rhinestones for a Gothic manicure that’s still on-trend with Halloween beauty trends.
Related Topics
black halloween nails
spooky nail art
gothic manicure
Halloween beauty trends
dark nail ideas
advanced nail designs
seasonal nail art
creative Halloween nails
trendy nail styles
easy Halloween nails
nail art techniques
Halloween fashion