Halloween is just around the corner, and that means it’s time to get into the festive spirit! This time of year always reminds me of the excitement of dressing up and showing off creative nail art that captures the essence of the season. If you’re someone who loves to express your personality through adorable nail designs, this one’s for you. I put together a list of 16 cute Halloween nails ideas that are fun, spooky, and perfect for getting you in the Halloween mood.
Whether you’re a nail art novice or a seasoned pro, these festive manicure ideas are sure to inspire your creativity. You’ll find everything from playful pumpkins to whimsical witch hats. Plus, these nail designs are not just cute; they’re also a great conversation starter at any Halloween party! Get ready to showcase your style with these charming nail inspirations that will make your fingers as festive as your costume.
In this post, you’ll discover 16 delightful nail art ideas that combine cuteness with Halloween fun. Each design is easy to recreate, so you can enjoy your Halloween celebrations with nails that truly pop. Now, let’s dive into these spooky yet adorable nail ideas that will have you reaching for your nail polish and nail art tools!
Key Takeaways
– Wide Variety of Designs: Explore 16 unique Halloween nail designs that range from cute ghosts to playful monsters, ensuring there’s something for everyone.
– Step-by-Step Inspiration: Each nail design is simple enough to recreate, making it perfect for both beginners and experienced nail artists.
– Trendy Themes: Stay on-trend with these spooky nail art ideas that incorporate popular Halloween motifs and colors.
– Creative Expression: Use these festive manicure ideas to express your personality and get into the Halloween spirit.
– Perfect for Parties: These cute Halloween nails are not only fun to create but also make you stand out at any Halloween gathering or event.
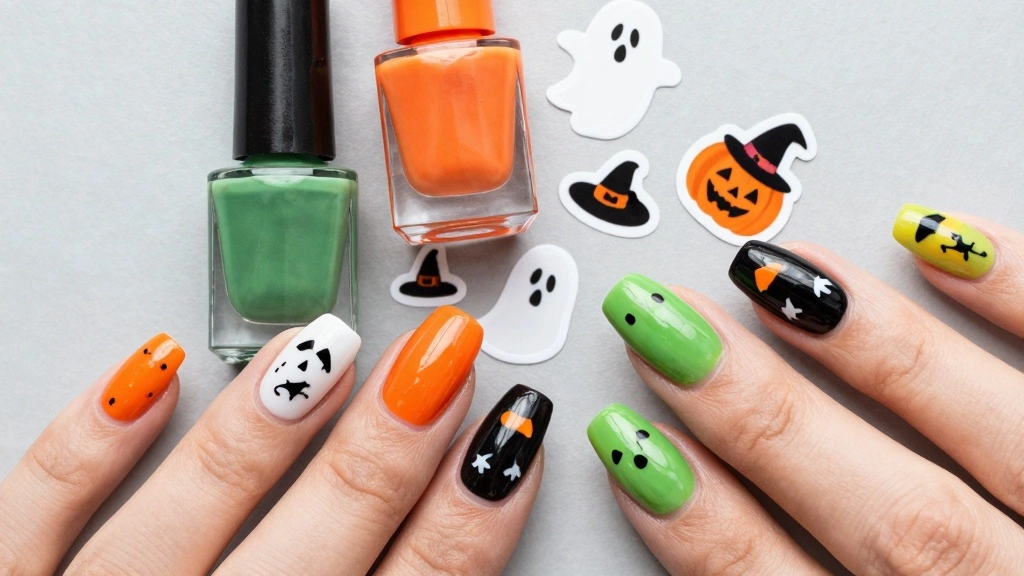
1. Adorable Ghosts
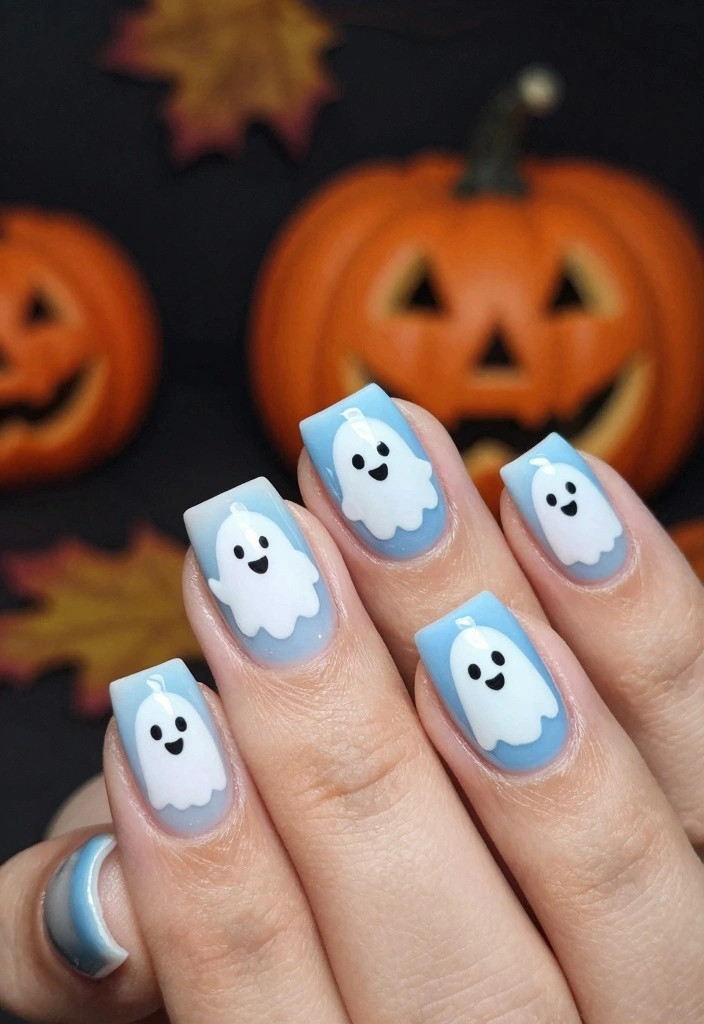
Get ready to embrace the Halloween spirit with some adorable ghost nail art! These playful little spirits add a fun twist to your nails, perfect for any festive occasion. Start with a base of bright white or soft pastel to make your ghosts pop. With a fine-tipped brush, create rounded ghost shapes and add tiny black dots for eyes and cheerful smiles to bring them to life. A matte top coat can give your design an interesting texture, or you can sprinkle on some glitter for that magical shimmer.
You’ll find this design easy to replicate at home, and it offers plenty of room for customization. Change up the base colors to suit your outfit or mood, or try using different ghost expressions for added fun. Here are some tips to nail this look:
– Apply a solid base coat to prevent staining and enhance durability.
– Use nail stickers for a quick, mess-free option.
– Always seal your design with a top coat to keep those adorable ghosts intact!
Fun fact: 72% of nail art lovers try cute halloween nails featuring tiny ghosts for Halloween. These adorable ghosts pop on a white base, and a matte top coat keeps them playful and chic for any spooky event.


How To Choose Cute Halloween Nails
Choosing the perfect cute Halloween nails can be a fun and exciting task! With so many adorable designs, it’s easy to get lost in all the options. Here are some key points to guide you in making the right choice for your festive manicure.
1. Style Preference
Think about what style resonates with you. Do you want something spooky, like little ghosts and creepy crawlies, or do you prefer a more playful touch, like candy corn or pumpkins? Consider designs that match your personality and mood for Halloween. Kawaii styles, characterized by their cute and whimsical look, can add a fun twist to traditional Halloween themes.
2. Nail Length
Your nail length plays a big role in how a design will look. Longer nails can boast intricate patterns like haunted houses or spider webs, while shorter nails may suit simple designs like bat silhouettes or candy corn dots. Make sure to choose a design that complements your nail length for the best effect.
3. Color Palette
Halloween is all about bold colors! Think about what colors you love to wear. Classic shades include orange, black, purple, and green. You can also mix them with pastels for a cute twist! Ensure the colors you select not only match your Halloween outfit but also reflect your personal style. Play around with a few combinations to see what makes your nails pop!
4. Occasion
Consider where you’ll be wearing these cute Halloween nails. Are you going to a party, trick-or-treating, or just enjoying a cozy night in? If it’s for a casual event, you might opt for simpler designs. For a party, go for something more extravagant with glitter and nail art. Keep in mind that you might need a more durable design if you’ll be out and about a lot.
5. Nail Care Products
Choosing good quality nail care products is essential. Look for polishes that are chip-resistant and quick-drying, especially if you have a busy schedule. Consider using a base coat to protect your nails and a top coat for added shine and durability. Investing in good products will ensure your Halloween nails stay cute and fresh longer.
6. DIY vs. Salon
Decide if you want to create your Halloween nails at home or visit a salon. If you enjoy crafting and have the time, DIY nail art can be a fantastic and budget-friendly option. On the other hand, a professional at a salon can help you achieve more complex designs with precision. Think about your skills and the time you want to spend on your nails.
Pro Tip: If you’re new to nail art, start with simple designs or use nail stickers to make the process easier! It’s a fun way to express your style without overwhelming yourself. Happy nail painting!
2. Playful Pumpkin Patches
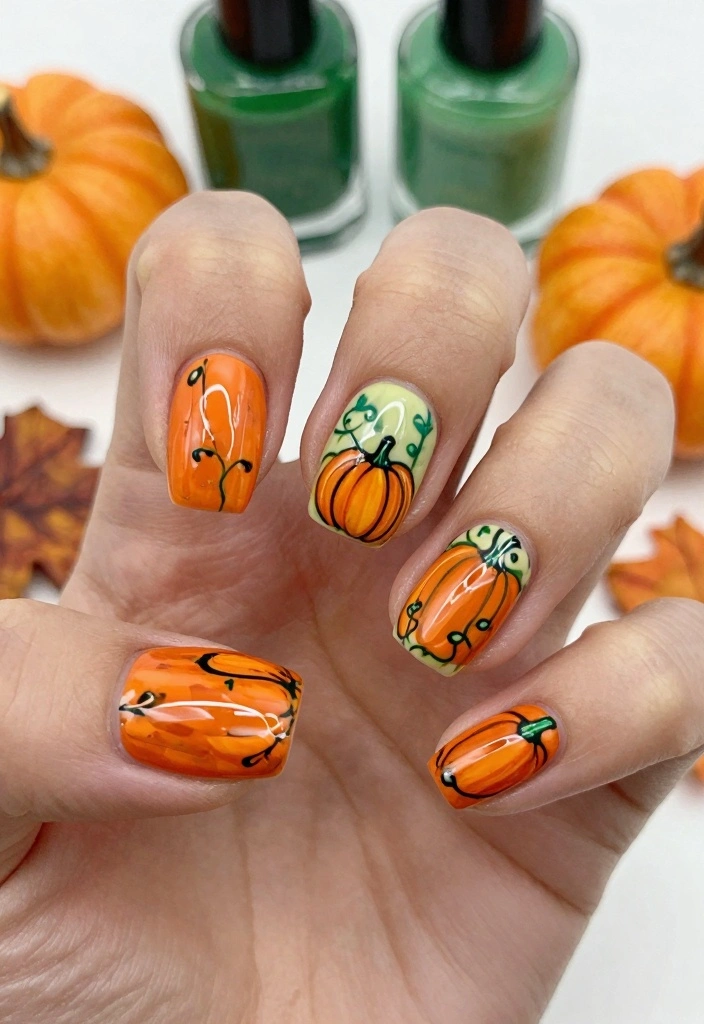
Celebrate Halloween with delightful pumpkin nail art that brings cheer to your fingertips! Start with a vibrant orange base coat, and use a nail brush to paint cute pumpkin shapes, adding green vines for detail. Vary the sizes of your pumpkins to create a charming patch effect across your nails. For a rustic twist, mix in neutral tones like beige or brown, and don’t hesitate to sprinkle some glitter on for that extra sparkle!
This festive design is all about keeping the Halloween spirit lively and fun. You can experiment with different shades of orange to add depth and dimension. Here are some handy tips:
– Use a dotting tool for precise pumpkin shapes.
– Take your time, allowing each layer to dry thoroughly for a polished finish.
– Consider using a glossy top coat to add shine and protect your art.
3. Spooky Spider Webs
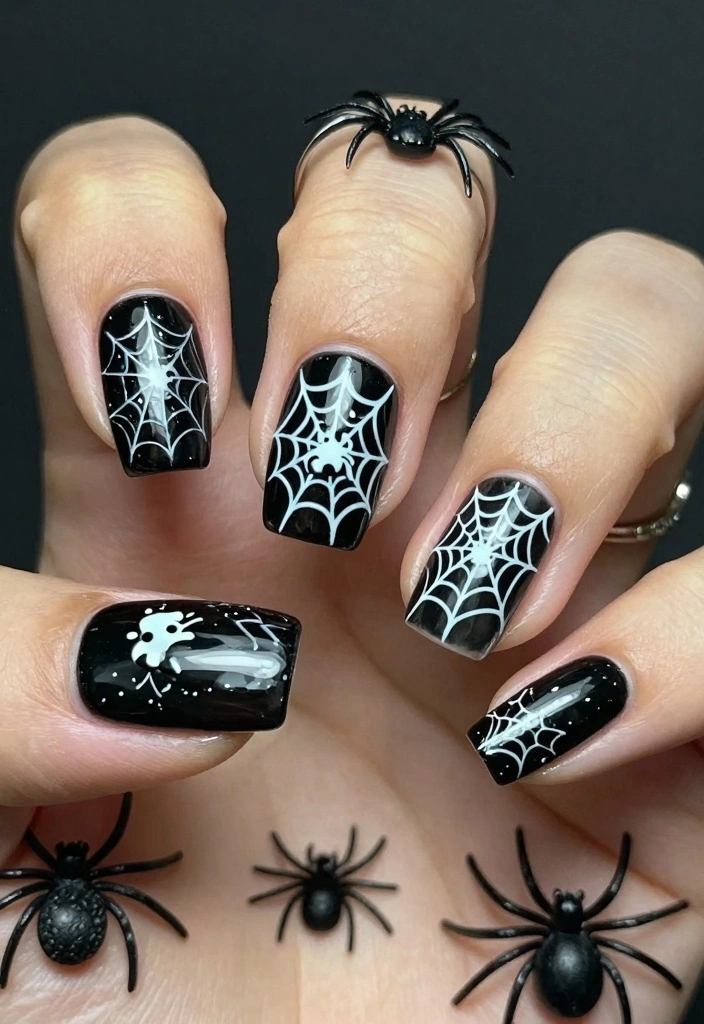
Turn your nails into a canvas for spooky spider webs that balance fun and elegance. Start with a deep black or dark purple base for a dramatic backdrop. Once dry, use a striping brush to carefully create intricate web designs in white or metallic polish. Add tiny, cute spiders dangling from the webs for a playful touch! This design is versatile enough to suit any Halloween gathering.
To make your spider web design stand out, consider using matte polish for the webs and a glossy top coat for the base. Here are some essential tips:
– Practice your web technique on paper before applying to your nails.
– Use a quick-dry top coat to prevent smudging.
– Pair your spider web nails with stylish rings for a fashionable flair!


4. Whimsical Witch Hats
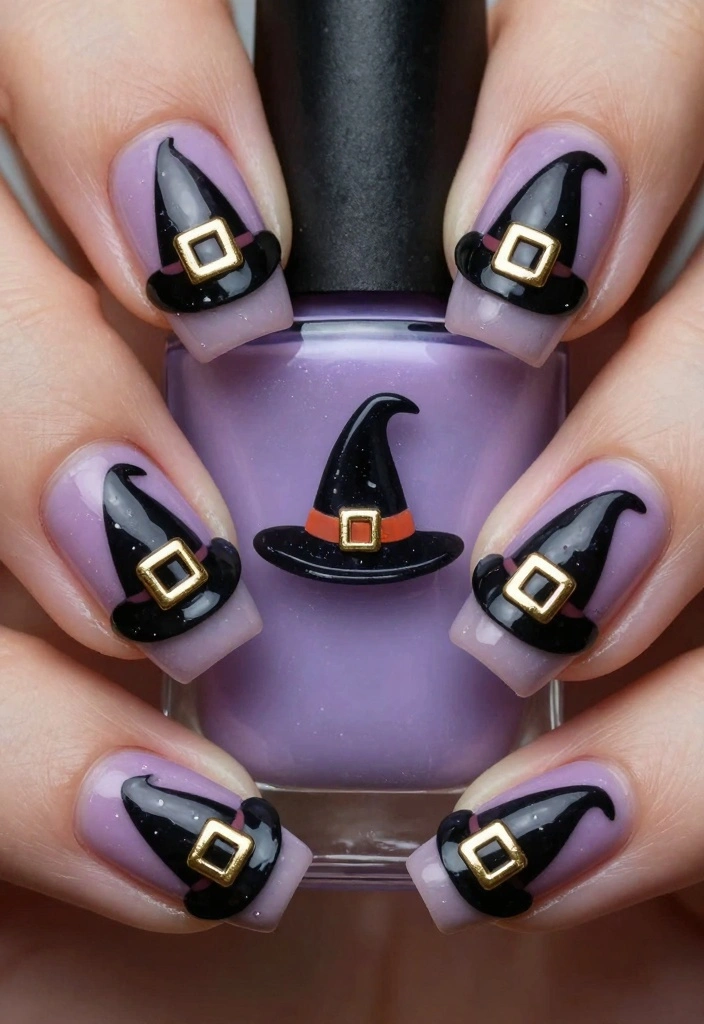
Witch hats add a playful touch to your Halloween nail art, making them a delightful choice! Start with a soft pastel base like lavender or mint green. Use a fine brush to paint tiny witch hats in black or dark purple, adding a shiny buckle for charm. Mix up the designs to create a fun patchwork effect across your nails. A glossy top coat will seal your whimsical creations beautifully.
If you’re short on time, consider using nail art stickers for a quick fix. Here’s how to elevate your witch hat designs:
– Utilize a nail art pen for detailed accents.
– Experiment with glitter backgrounds to add a magical vibe.
– Keep other nail art elements simple so the hats truly shine.


5. Cute Candy Corn

Celebrate Halloween with playful candy corn nail art that’s sure to delight! Begin with a fresh white base coat and layer on bright yellow, orange, and white in a triangular pattern that mimics the candy. The sharp edges of the triangles will give the design a clean and festive look. These nails not only look sweet but also bring a cheerful vibe!
For an added twist, sprinkle tiny candy corn stickers or gems to enhance the fun. Here are some tips for perfecting your candy corn nails:
– Use striping tape for crisp, clean lines.
– Allow each layer to dry completely before adding the next to prevent smudging.
– Finish with a glossy top coat for that sweet shine!
6. Mummy Mania
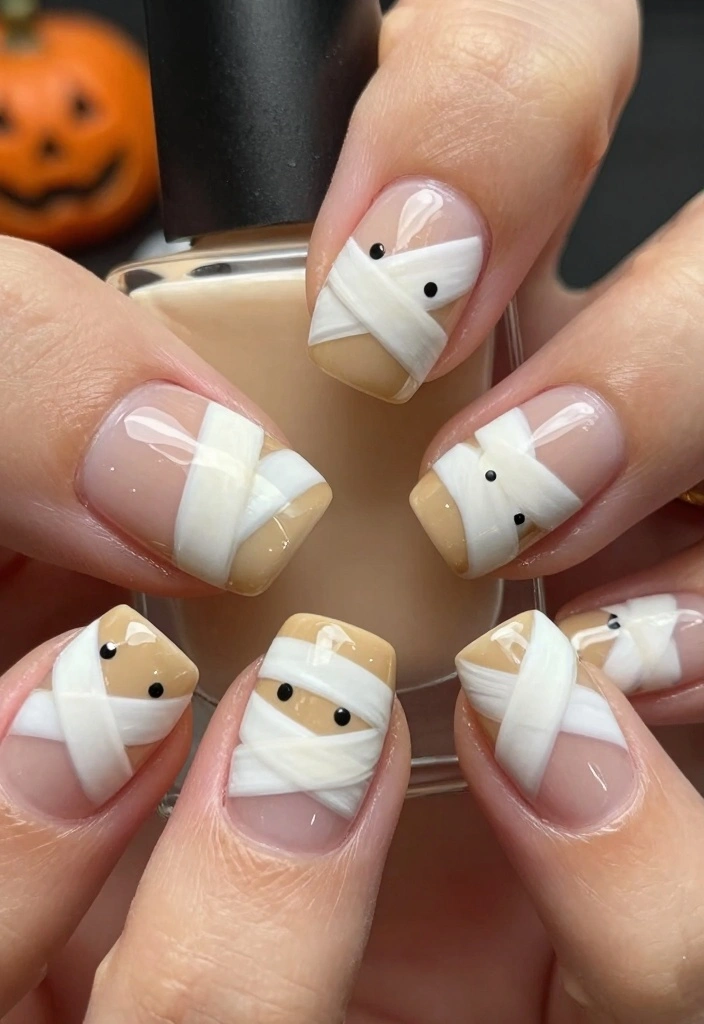
Mummies can be cute too, and this nail art is proof! Start with a warm beige or cream base to mimic mummy wrappings. Use a thin brush to create horizontal lines that resemble bandages, and don’t forget to paint tiny black eyes peeking out for a fun twist. A matte top coat adds a unique texture to your design.
This look is perfect for any Halloween celebration! If you want to amp it up, add spooky gems or fun stickers. Here are some tips to ace your mummy nails:
– Keep the lines evenly spaced for a clean appearance.
– Use a long-lasting base coat to prevent color bleeding.
– Seal your design with a glossy top coat to ensure it shines!
7. Friendly Frankenstein
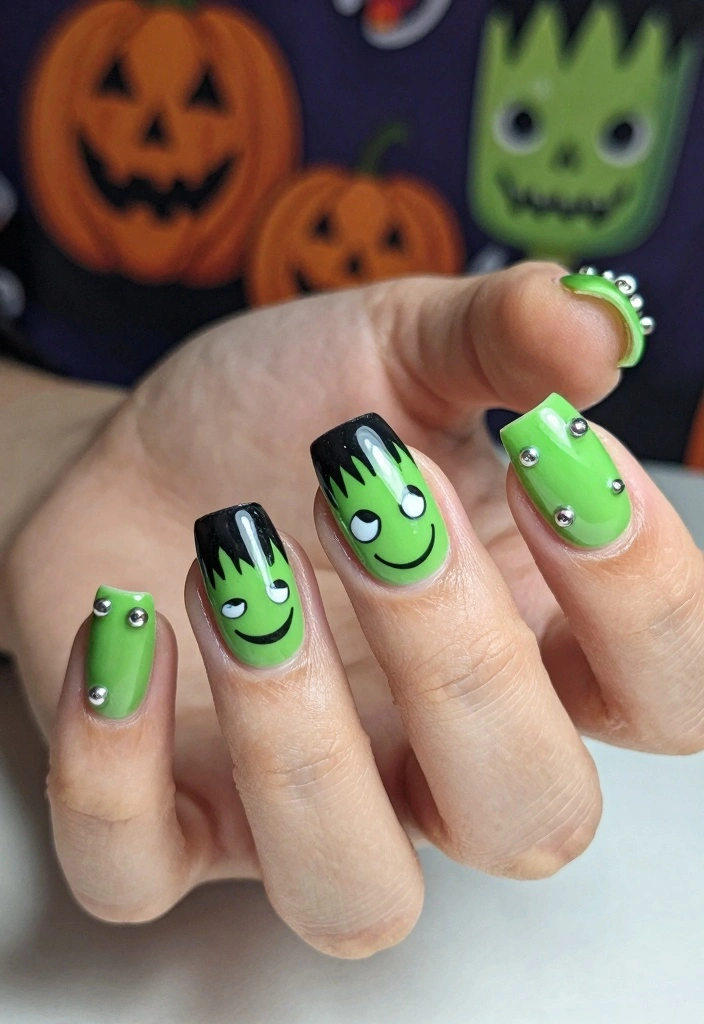
Put a cute spin on a classic character with friendly Frankenstein nail art! Start with a vibrant green base to create a cheerful vibe. With a nail brush, add black hair at the top and a smiley face with big, round eyes. Don’t forget to include little bolts on the sides of your nails for that playful “mad scientist” effect. Seal everything in with a top coat for lasting wear.
This fun design is sure to bring smiles! Here are some tips to help you get it just right:
– Use a small dotting tool for perfectly shaped eyes.
– Pair with contrasting colors like purple or orange for a fun mix.
– Keep your lines clean for the best overall look!
8. Haunted House Delights

Add a touch of eerie charm to your nails with a haunted house design! Start with a dark blue or deep purple base that resembles a night sky. Use a fine brush to create black silhouettes of spooky houses, bats, and a crescent moon. Adding glowing yellow windows can bring your haunted houses to life! A top coat will enhance and brighten your detailed work.
This design strikes a balance between spooky and beautiful! To achieve the best haunted house nails, consider these tips:
– Use a thin brush for intricate details.
– Layer your paints for added depth, allowing each layer to dry first.
– Take your time to let your creativity shine!
9. Kawaii Batty
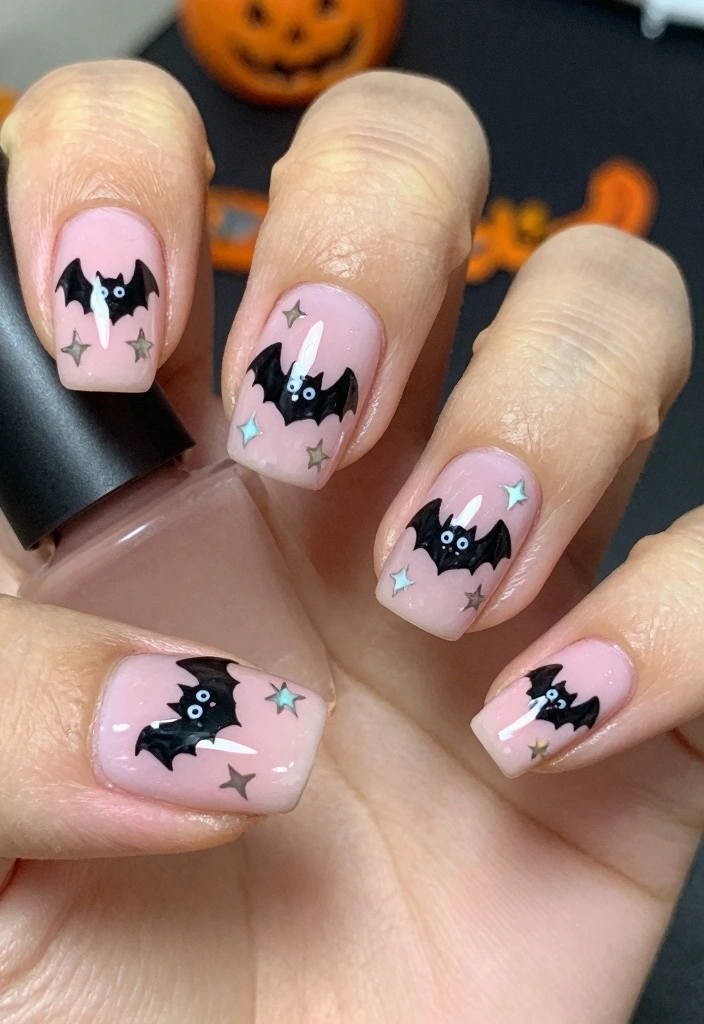
Bats can be adorable too, especially with this kawaii bat nail art! Start with a soft pastel pink or light blue base for a gentle touch. Using a nail art brush, paint tiny bats with cute expressions. Add little bows or glitter to amp up the cuteness factor. This design is perfect for anyone who loves whimsical art!
To get the best kawaii bats, consider these tips:
– Practice drawing bats on paper for perfect shapes.
– Add star designs around the bats for an enchanted feel.
– Finish with a thick layer of top coat to make your designs pop!
10. Fun with Skeletons
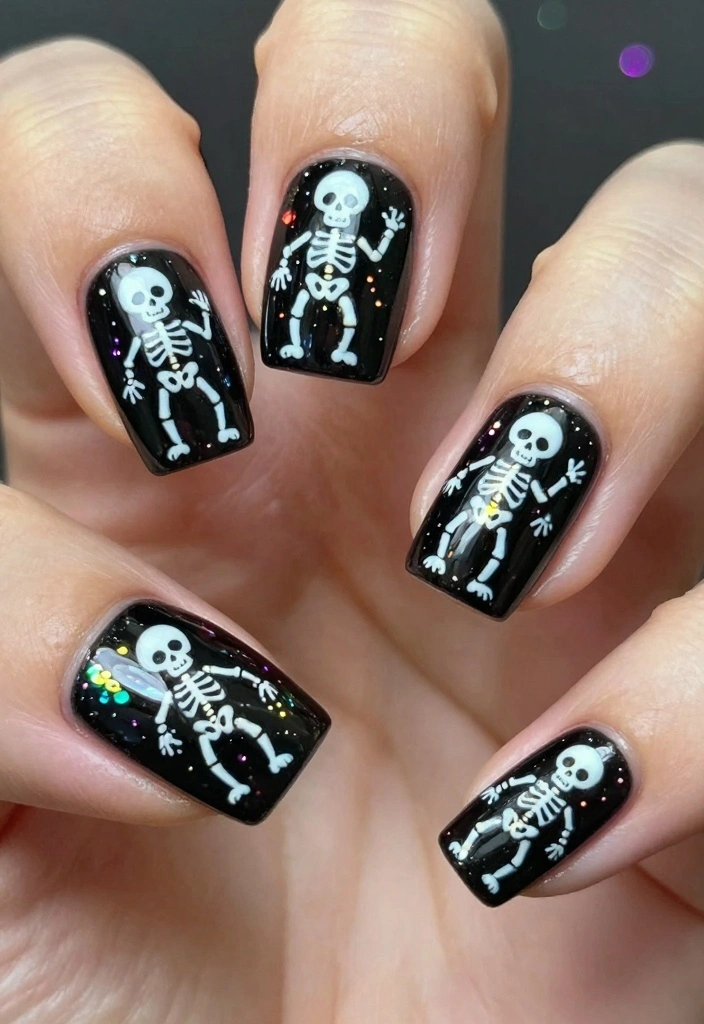
Skeletons can be charming and fun with this playful nail art! Start with a classic black base for a timeless look. Using white polish, create tiny skeletons dancing across your nails with cheerful poses. Enhance your design with colorful backgrounds or a touch of glitter for extra flair.
This design captures the essence of Halloween while keeping things cute! Here are some tips to nail this look:
– Use a fine brush for precise details.
– Consider glow-in-the-dark polish for a fun surprise!
– Add a top coat to ensure your design shines bright.
Fun fact: Glow-in-the-dark polish can glow for up to 6 hours, making skeleton designs pop in low light for cute halloween nails. Use 2 coats of white for crisp bones and a slim brush for tiny dancing bones. Seal with a glossy topcoat to keep sparkle and durability.
11. Colorful Autumn Leaves
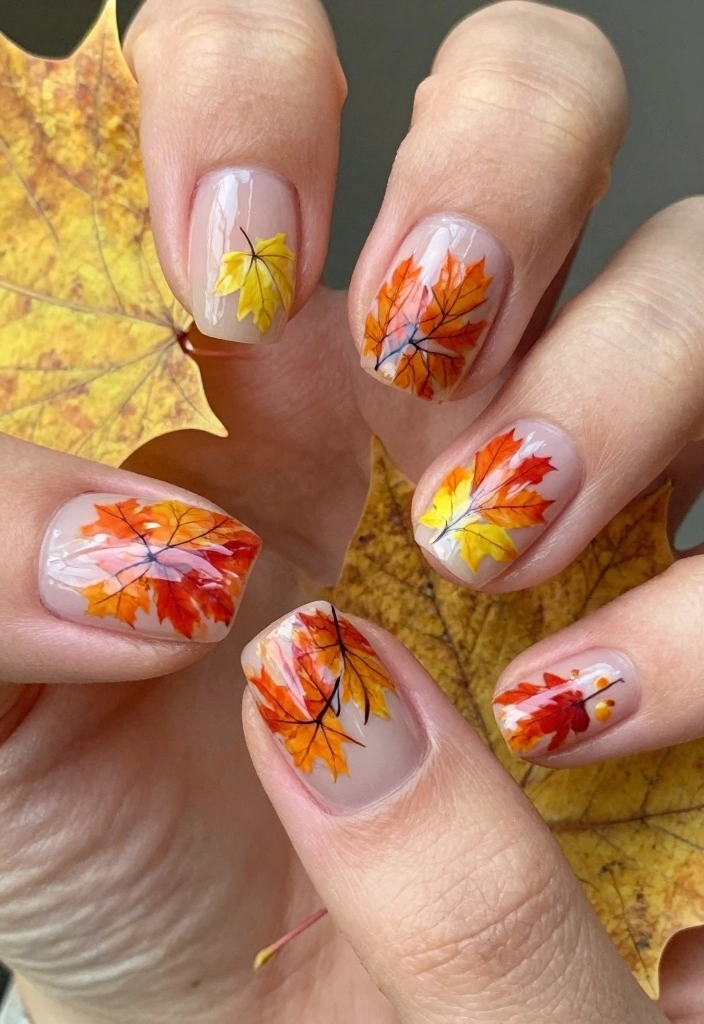
Embrace the beauty of fall with vibrant autumn leaves on your nails! Start with a nude or peach base that allows your leaf designs to stand out. Using a dotting tool or small brush, create colorful leaf shapes in shades of orange, yellow, and red. This design celebrates the spirit of Halloween while showcasing the beauty of the season. Add tiny lines to mimic leaf veins for realism.
Mixing matte and glossy top coats can create an interesting texture. Here are some tips:
– Use various shades of the same color family for added depth.
– Get creative; no two leaves need to look the same.
– Finish with a quality top coat to seal your art.
12. Cute Cauldrons

Celebrate the season with creative cauldron nail art that brews up magic! Start with a dark green or black base, painting little cauldron designs in contrasting colors like brown or purple. Add colorful bubbles spilling over to represent the witch’s brew, and consider incorporating glitter for an enchanting touch!
This design is sure to cast a spell on anyone who sees it. To perfect your cauldron art, keep these tips in mind:
– Outline your cauldrons with a fine brush for definition.
– Use a dotting tool for playful bubble designs.
– Always finish with a top coat for a lasting finish.
13. Sweet Skull Designs
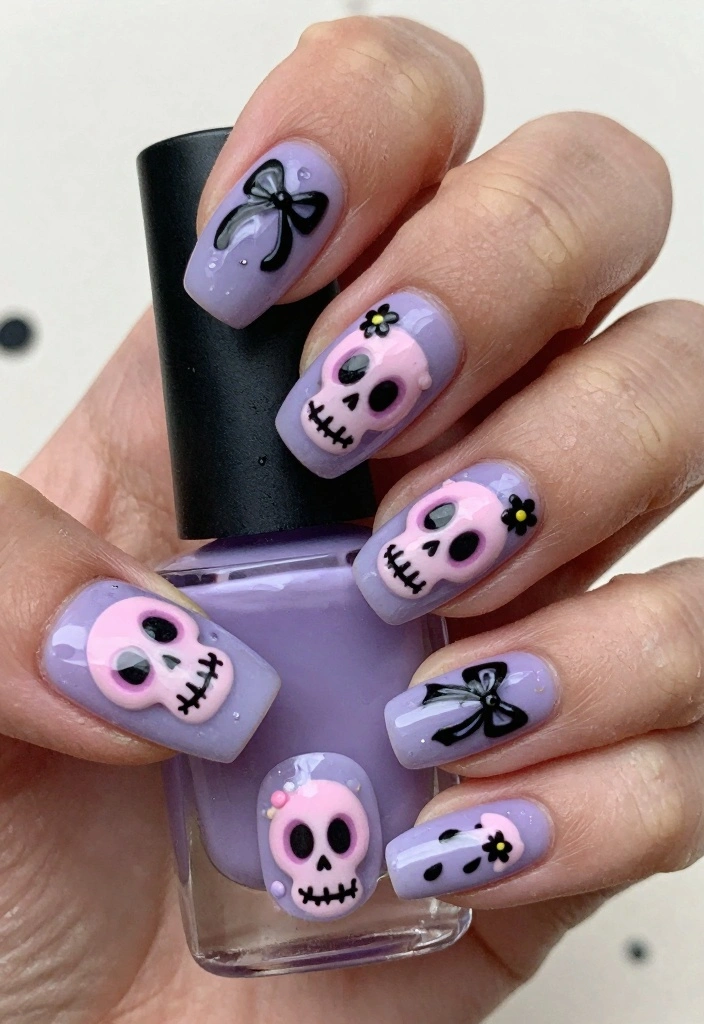
Skulls can be charming too, especially with cute designs for Halloween! Start with a light pink or lavender base and create small skulls with smiling faces. Add bows or flowers for extra charm, blending spooky with sweet perfectly. This design is ideal for Halloween gatherings where you want to stand out!
Here’s how to craft the best skull designs:
– Use a dotting tool for precise circles and details.
– Mix and match flower colors for vibrancy.
– Seal everything with a glossy top coat to maintain brightness!
Cute Halloween nails prove you can be spooky and sweet at once. Start with a pink or lavender base, then add tiny skulls with smiling faces, plus bows or flowers. Use a dotting tool, mix vibrant colors, and seal with gloss for lasting charm.
14. Charming Candy Skulls
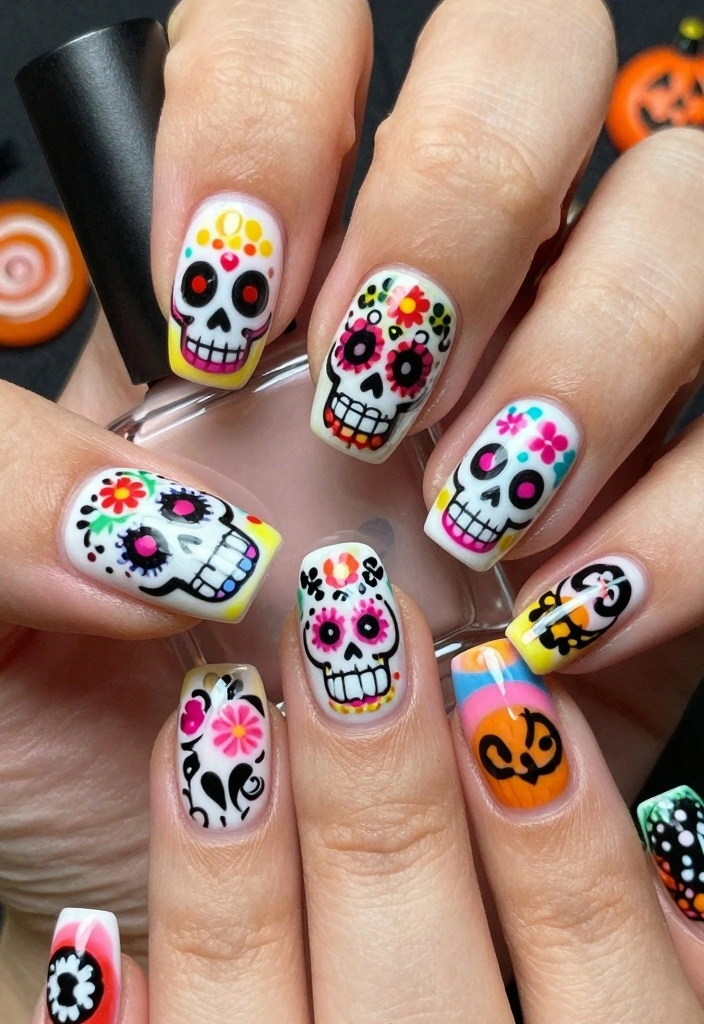
Add a lively twist to your Halloween nails with charming candy skull designs! Start with a bright base coat in colors like turquoise, pink, or purple. Paint intricate skulls adorned with colorful patterns and flowers, making them festive and lively! Nail gems or glitter can enhance the candy details for extra fun.
Here are some tips for success:
– Use a high-quality nail art brush for detailed designs.
– Take your time with the patterns; don’t rush!
– Finish with a shiny top coat to make the colors pop!
15. Sparkly Starry Night
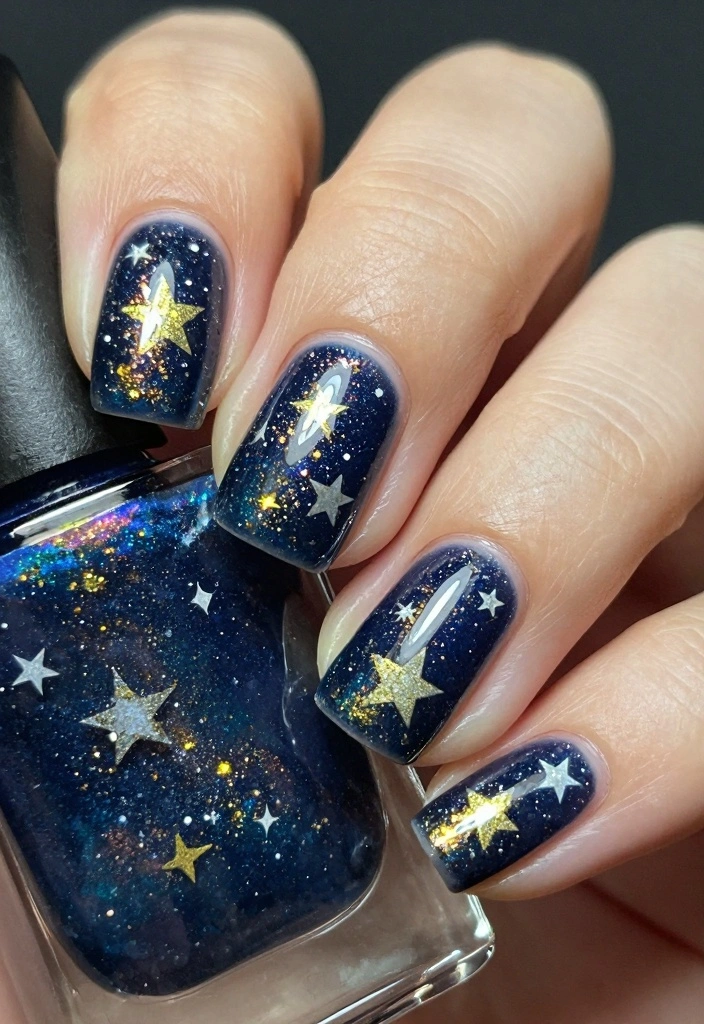
Celebrate Halloween with a mesmerizing night sky full of twinkling stars! Start with a deep navy or black base, and use a sponge to dab metallic gold or silver for the stars. This design creates a magical effect, perfect for the season. Add a crescent moon for an extra touch of whimsy!
This starry design is enchanting and ideal for evening outings! Here are some tips:
– Use a makeup sponge for best results when applying stars.
– Create varying star sizes for a dynamic look.
– A quick-dry top coat will help seal your design effectively!
16. Playful Monster Mash
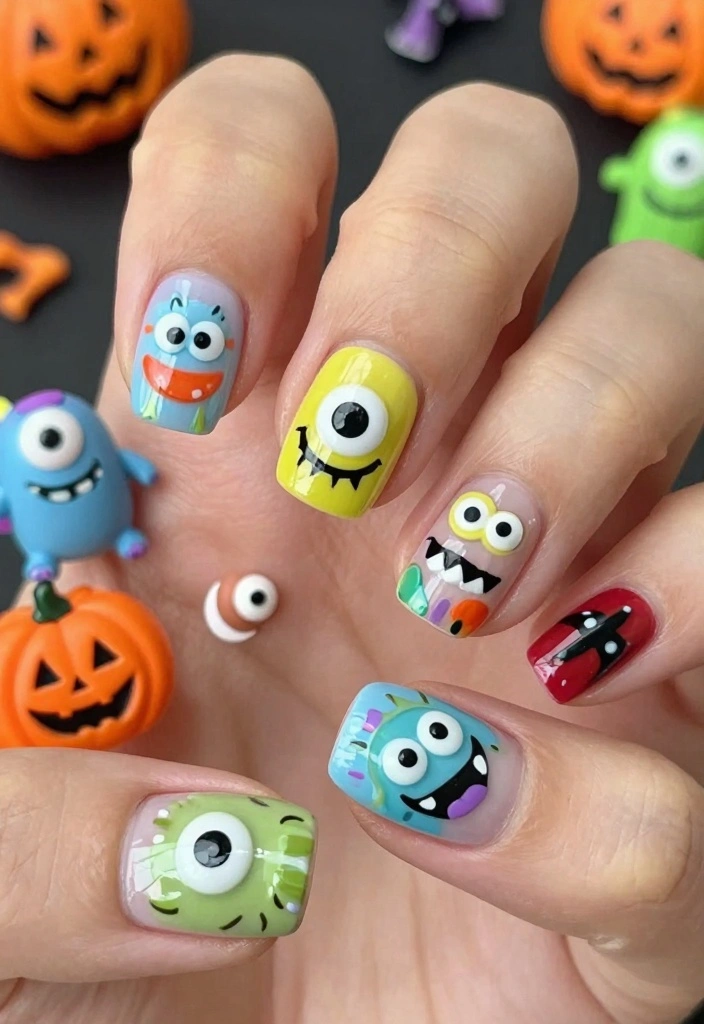
Bring a fun spirit to Halloween with playful monster designs on your nails! Start with a bright base color like teal or orange, and create cute monster faces with big eyes, fuzzy hair, and goofy grins. You can go as simple or elaborate as you like, making this style a canvas for your creativity. Add googly eyes or fluffy nail art for extra dimension!
This design is perfect for anyone looking to add a whimsical touch this spooky season. Here are some tips:
– Use multiple colors to make each monster unique.
– Let your imagination run wild with the features.
– Top it off with a protective coat to keep your monsters vibrant!
Conclusion

This Halloween, let your nails do the talking!
With these 16 cute Halloween nail ideas, you can express your fun and festive spirit in the most adorable way possible. From playful ghosts to vibrant skulls, there’s a design for every Halloween lover out there. So grab your nail polish, gather your friends, and let the nail art adventure begin!
Frequently Asked Questions
What are the best cute halloween nails ideas for a kawaii style?
Looking for the cutest way to wear a kawaii twist this season? Here are top options for cute halloween nails that fit a playful vibe. Think glossy black with tiny jack-o’-lantern faces, pastel ghosts, orange and white stripes with adorable eyes, purple glitter with bats, candy corn accents, and little monsters or moons. These Halloween nail designs stay cute while staying spooky.
Mix and match characters with a soft color palette to keep the look cohesive and festival-ready.
How can I achieve kawaii Halloween nail art at home without professional tools?
You can absolutely nail Halloween nail designs at home with a few basics. Start with a clear or neutral base coat, then build color blocks using a small brush or nail tape. Use a dotting tool for eyes, a tiny brush for smiles, and decals or stickers for instant cute details. Finish with a glossy top coat to seal every layer for long-lasting spooky nail art that still looks cute.
For extra pop, try stamping plates or nail art brushes to create precise faces and characters.
Which colors and embellishments help balance spooky and cute in Halloween nail art?
A balanced kawaii palette blends dark and pastel tones. Try black or charcoal bases with orange, lavender, or mint accents. Add tiny charms, stickers, or rhinestones sparingly so the design reads cute rather than cluttered. Semi-matte finishes paired with a glossy top coat create a festive manicure ideas vibe that still feels playful and lighthearted.
Keep designs simple: one main character or motif per nail with a few tiny accents for a cohesive look.
What common mistakes should I avoid with kawaii Halloween nails?
Avoid overloading nails with decals or texture; it can look messy and chip quickly. Don’t skip a good base coat or top coat, which leads to lifting and dull color. Be mindful of brush strokes and let layers dry fully to prevent smudges. If you’re new, start with a single-feature nail and build up gradually so every stroke stays neat and cute nail trends ready.
Tip: use a quick-dry top coat and cure nails under LED/UV to speed up the process.
How can I extend the life of my cute halloween nails and keep them looking fresh?
Prep nails well and apply a strong base coat to prevent staining. Seal with a durable top coat, and reapply it every 2-3 days to prevent chipping. Avoid harsh acetone removers and use a gentle remover when you’re ready to switch looks. For extra longevity, consider a festive manicure ideas routine: clip and file nails evenly, moisturize cuticles, and store your favorite nail art stickers for quick touch-ups. This keeps your Halloween nail inspirations looking fabulous through the season.
Related Topics
cute halloween nails
spooky nail art
kawaii nail designs
festive manicure
Halloween nail inspirations
easy nail trends
fun nail ideas
holiday nail art
beginner friendly
creative nail designs
seasonal nail art
quick Halloween nails